Adding a Trusted Certificate Authority (CA)
June 13, 2023
Introduction
The flexibility and ease with which Maximo can integrate with other systems using web services, using either SOAP or REST, is one of its best technical features. The integration may be something simple like a notification REST call to an external system or a full financial integration including dozens of integration points. Typically, these external services will be accessed via a secure HTTP connection (HTTPS), to ensure that transmission of data is secure, and importantly that the external service is actually the service we're expecting to be communicating with. The HTTPS connection uses Secure Socket Layer (SSL) and Transport Layer Security (TLS) to establish an encrypted and verified connection to the other server.
Cloudflare has a good article explaining why HTTPS and SSL/TLS is important and how you can go about obtaining a SSL/TLS certificate: https://www.cloudflare.com/learning/ssl/what-is-an-ssl-certificate/
Chain of Trust
SSL is built upon the concept of a "Chain of Trust", where the external service provides a certificate proclaiming its identity (including any intermediate certificates), and the client (in this case Maximo) is able to trace that certificate back to a certificate issued by a trusted Certificate Authority (CA) in order to verify that this is true. In order to do this, the client must have access to the CA certificates that it trusts.
A full explanation of certificate authorities is beyond the scope of this post. A more thorough explanation, including intermediate certificates, can be found here: https://www.ssl.com/faqs/what-is-a-certificate-authority/
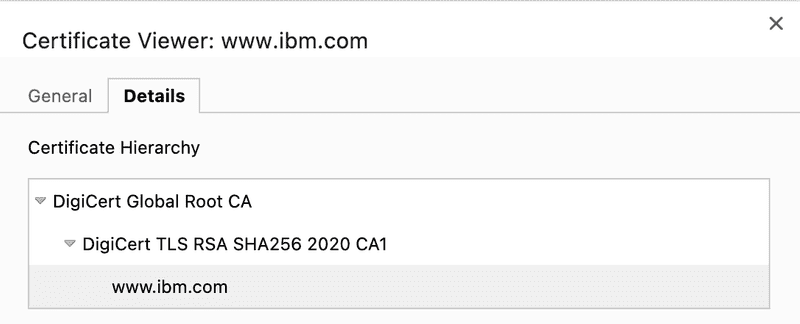
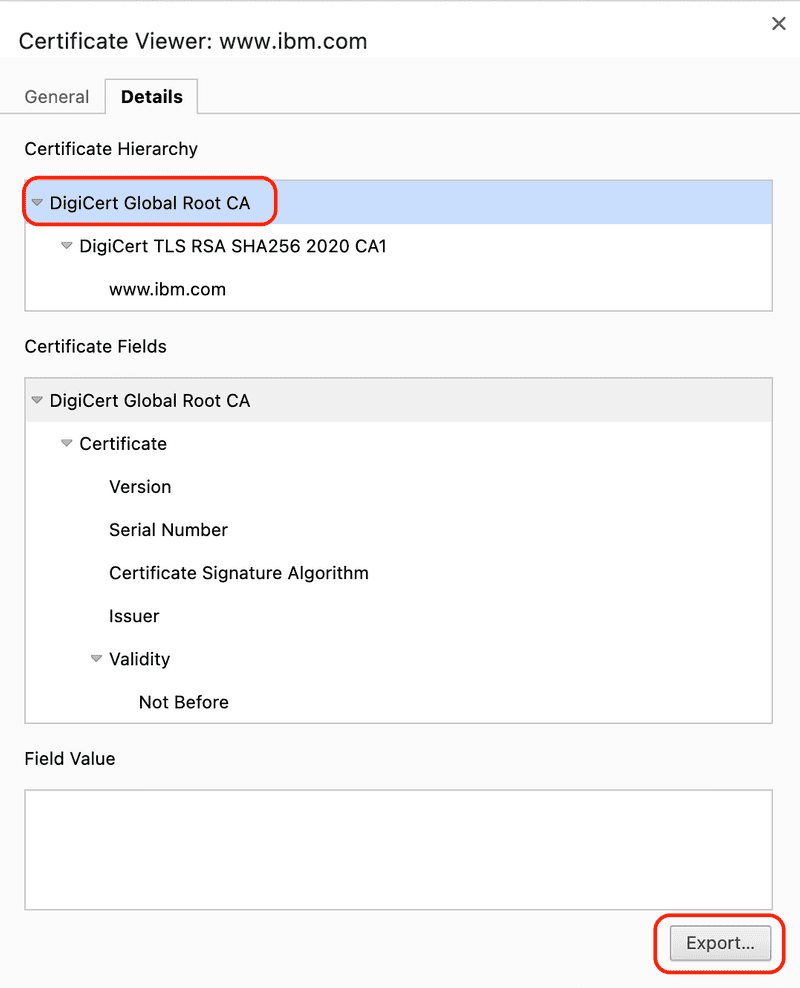
You can view this chain of trust in the your browser, for example if you look at the certificate for the https://ibm.com you can see that it is signed by Digicert TLS RSA SHA256 2020 CA1 and that in turn was signed by DigiCert Global Root CA.
Your browser and operating system come preinstalled with many commercial CA certificates, including the DigiCert Global Root CA certificate. When your browser is presented with the www.ibm.com and Digicert TLS RSA SHA256 2020 CA1 certificates, it is able to connect these in a valid signing chain to the DigiCert Global Root CA it contains, verify the chain of trust, and a secure connection to www.ibm.com can be established.
For WebSphere Traditional and MAS, the Java Virtual Machine (JVM) relies on a Java Key Store (JKS) to provide a list trusted CAs certificates. Out of the box this key store does not contain any external trusted CA certificates and any needed trusted CA certificates must be manually added. When you attempt to connect to an external service without importing the CA certificate first, you will receive an error message similar to the following, where the path to requested target is referring to the chain of trust, where the client is unable to link the certificates to a trusted CA certificate in the JKS trust store.
HTTP transport error: javax.net.ssl.SSLHandshakeException: com.ibm.jsse2.util.g:PKIX path building failed: java.security.cert.certPathBuilderException: unableto find valid certification path to requested target
In this post we will review how to identify and add a trusted CA certificate to WebSphere Traditional and MAS so that Maximo can establish secure connections to external services.
WebSphere
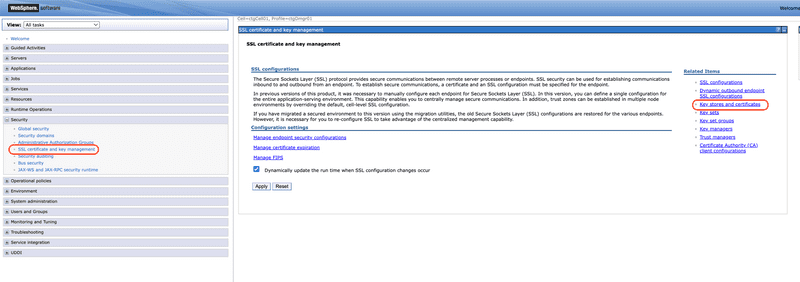
To add a trusted CA certificate to the WebSphere Traditional trust store, log into the WebSphere Console, then from the left side navigation menu expand the Security section and select SSL certificate and key management. Select Key stores and certificates from the Related Items section on the right.
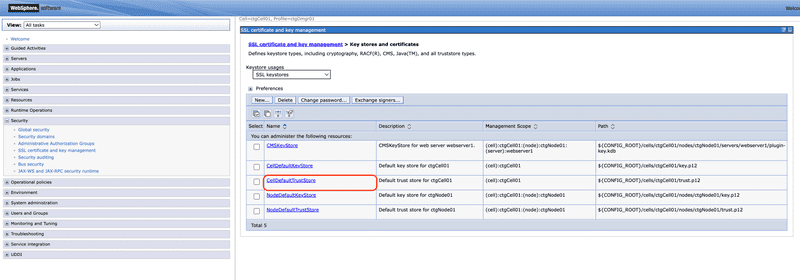
Select the CellDefaultTrustStore from list of key stores.
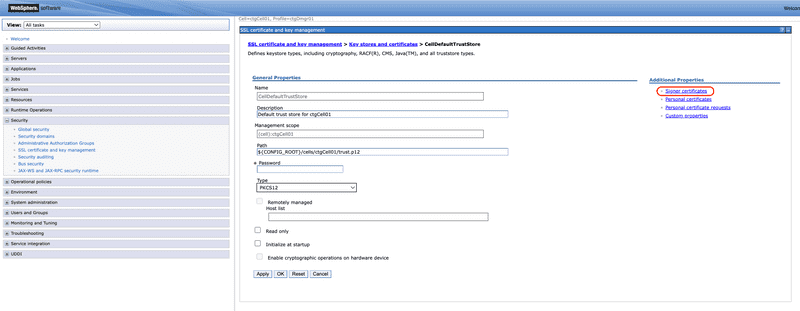
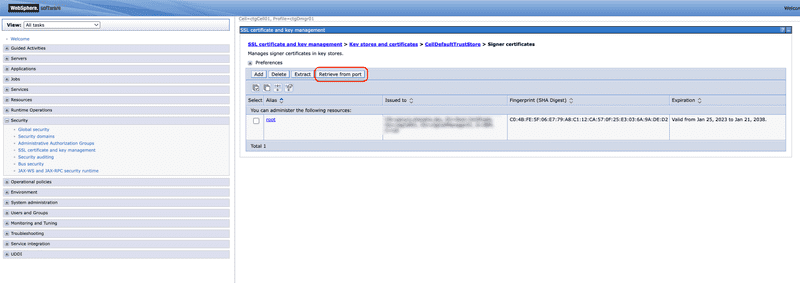
From the Additional Properties section select the Signer certificates link.
There will be at least one root trust certificate in the list already. This is the internal CA for WebSphere that was generated when WebSphere was installed and is used for signing certificates for internal WebSphere communication. A CA certificate can be manually downloaded and imported from a file, which is useful if the server does not have access to the target service. However, since the point of this exercise is to enable communication with another server it can be assumed that the server can access the service and therefore it is simpler to use the Retrieve from port function. Click the Retrieve from port button to start the retrieval process.
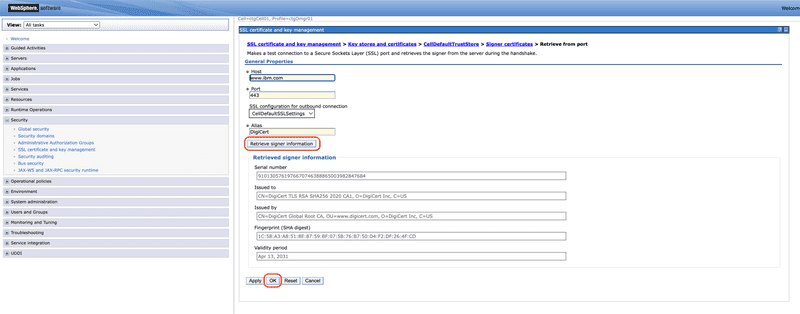
In the Host text box enter the host name for the target service, in our example we are using www.ibm.com. Note that this is the host name only without https protocol include. Next enter the port, which is typically 443. Next click the Retrieve signer information button to retrieve the CA certificate from the remote server. Using the information available in the Issue to text box enter an name in the Alias text box to identify the CA. In our example the Issue to is CN=DigiCert TLS RSA SHA256 2020 CA1, O=DigiCert Inc, C=US so we have selected DigiCert as the Alias value. Finally, click the OK button to import the CA to the trust store.
Click the Save link to save the CA to the trust store.
Finally, restart the Maximo application server or cluster for the new CA to be available to the Maximo Java process.
MAS
Export CA Certificate
For MAS you will need to obtain the trusted CA certificate in PEM format, which is an ASCII Base64 encoded X.509 encoded representation of the certificate.
PEM format stands for
Privacy Enhanced Mail, which was a failed attempt to secure email, but the format lives on as part of RFC 1422.
You can obtain the certificate by exporting it from your browser, simply by navigating to the URL. For the following example Chrome 114 on MacOS 13 was used, the procedure will be similar on other browsers and operating systems, but may have minor difference. For our example we will obtain the DigiCert root certificate from https://www.ibm.com.
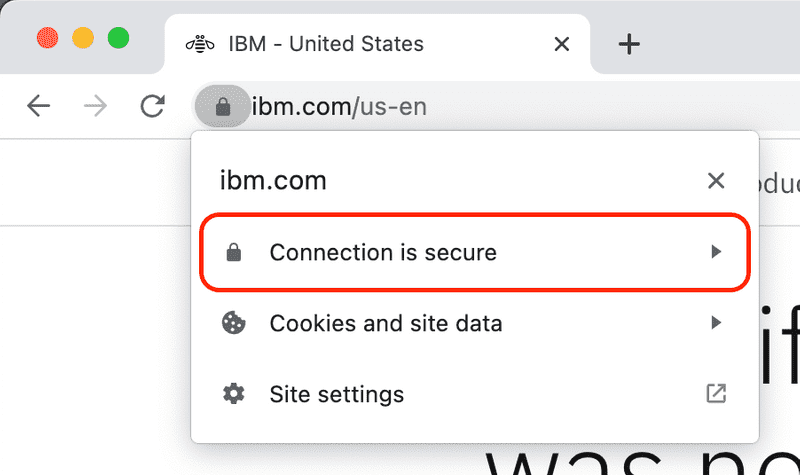
Open a browser (Chrome) and navigate to https://www.ibm.com. Notice the padlock icon at the start of the URL.
Click the padlock icon to access the security menu and then click the Connection is secure menu item.
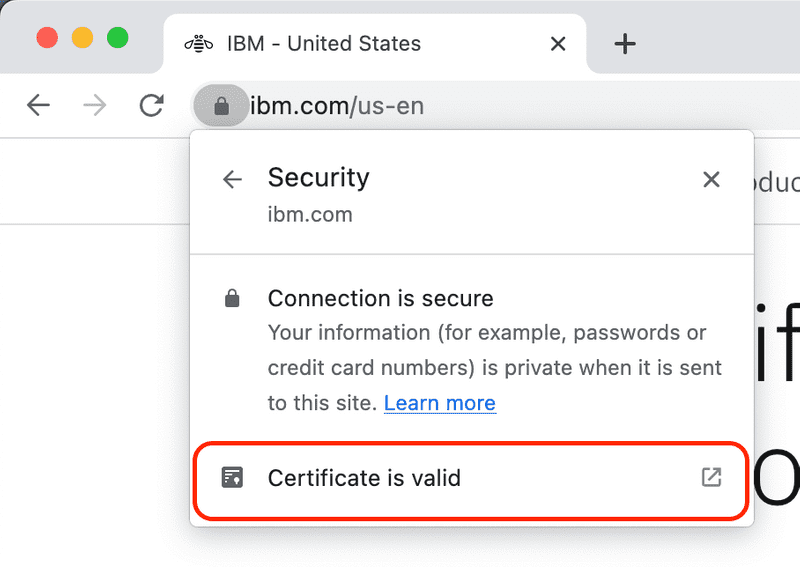
Next click on the Certificate is valid menu item.
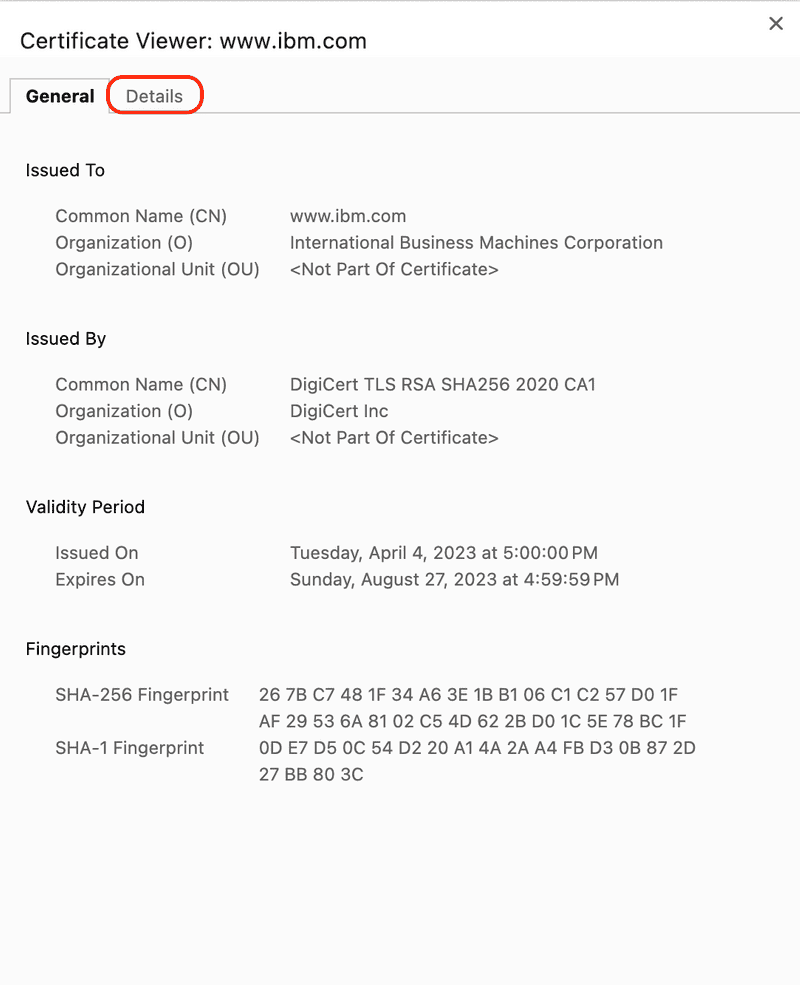
A dialog displaying general information about the certificate will be displayed. Click the Details tab to view the certificate details.
Select the root certificate in the Certificate Hierarchy text box and then click the Export button.
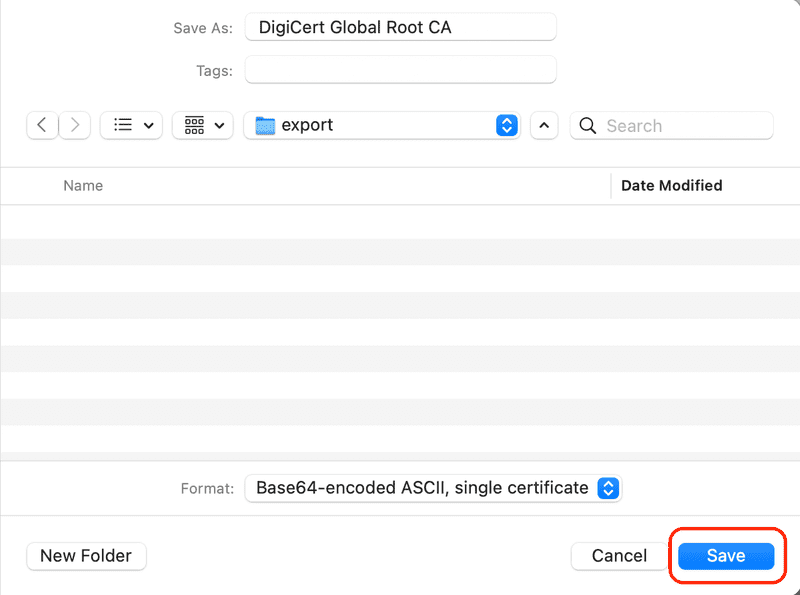
Finally, select a directory to save the certificate and click the Save button.
The certificate is exported in PEM format which is Base64 encoded text, so using a text editor such as Notepad++ (Windows) or TextMate (MacOS), open the saved PEM certificate. This encoded certificate text will be needed at the end of the next section.
The certificate should look like the following.
-----BEGIN CERTIFICATE-----MIIDrzCCApegAwIBAgIQCDvgVpBCRrGhdWrJWZHHSjANBgkqhkiG9w0BAQUFADBhMQswCQYDVQQGEwJVUzEVMBMGA1UEChMMRGlnaUNlcnQgSW5jMRkwFwYDVQQLExB3d3cuZGlnaWNlcnQuY29tMSAwHgYDVQQDExdEaWdpQ2VydCBHbG9iYWwgUm9vdCBDQTAeFw0wNjExMTAwMDAwMDBaFw0zMTExMTAwMDAwMDBaMGExCzAJBgNVBAYTAlVTMRUwEwYDVQQKEwxEaWdpQ2VydCBJbmMxGTAXBgNVBAsTEHd3dy5kaWdpY2VydC5jb20xIDAeBgNVBAMTF0RpZ2lDZXJ0IEdsb2JhbCBSb290IENBMIIBIjANBgkqhkiG9w0BAQEFAAOCAQ8AMIIBCgKCAQEA4jvhEXLeqKTTo1eqUKKPC3eQyaKl7hLOllsBCSDMAZOnTjC3U/dDxGkAV53ijSLdhwZAAIEJzs4bg7/fzTtxRuLWZscFs3YnFo97nh6Vfe63SKMI2tavegw5BmV/Sl0fvBf4q77uKNd0f3p4mVmFaG5cIzJLv07A6Fpt43C/dxC//AH2hdmoRBBYMql1GNXRor5H4idq9Joz+EkIYIvUX7Q6hL+hqkpMfT7PT19sdl6gSzeRntwi5m3OFBqOasv+zbMUZBfHWymeMr/y7vrTC0LUq7dBMtoM1O/4gdW7jVg/tRvoSSiicNoxBN33shbyTApOB6jtSj1etX+jkMOvJwIDAQABo2MwYTAOBgNVHQ8BAf8EBAMCAYYwDwYDVR0TAQH/BAUwAwEB/zAdBgNVHQ4EFgQUA95QNVbRTLtm8KPiGxvDl7I90VUwHwYDVR0jBBgwFoAUA95QNVbRTLtm8KPiGxvDl7I90VUwDQYJKoZIhvcNAQEFBQADggEBAMucN6pIExIK+t1EnE9SsPTfrgT1eXkIoyQY/EsrhMAtudXH/vTBH1jLuG2cenTnmCmrEbXjcKChzUyImZOMkXDiqw8cvpOp/2PV5Adg06O/nVsJ8dWO41P0jmP6P6fbtGbfYmbW0W5BjfIttep3Sp+dWOIrWcBAI+0tKIJFPnlUkiaY4IBIqDfv8NZ5YBberOgOzW6sRBc4L0na4UU+Krk2U886UAb3LujEV0lsYSEY1QSteDwsOoBrp+uvFRTp2InBuThs4pFsiv9kuXclVzDAGySj4dzp30d8tbQkCAUw7C29C79Fv1C5qfPrmAESrciIxpg0X40KPMbp1ZWVbd4=-----END CERTIFICATE-----
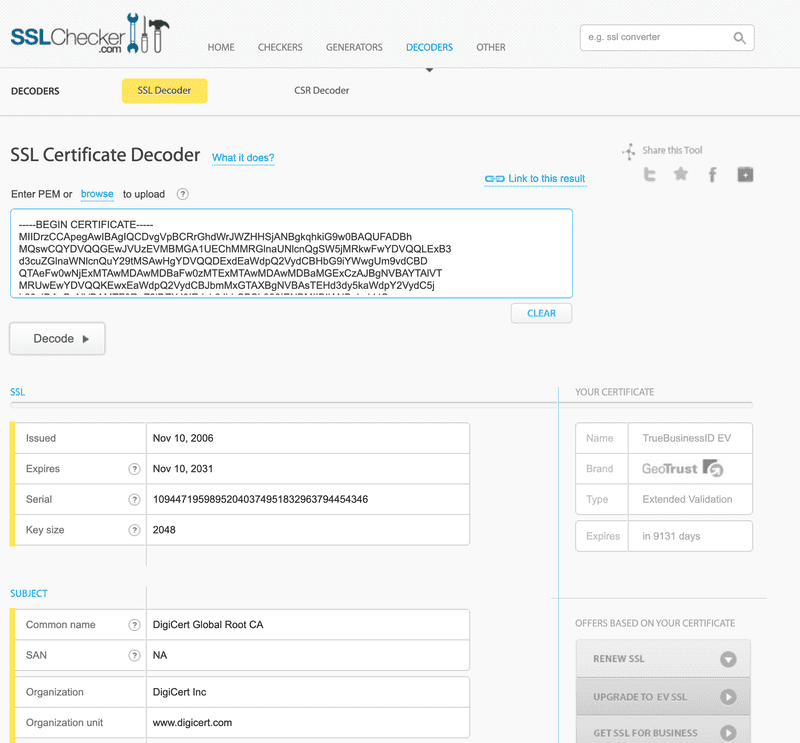
If you want to verify the exported certificate you can go to https://www.sslchecker.com/certdecoder and paste the encoded certificate in the
Enter PEMtext box.
Import CA Certificate
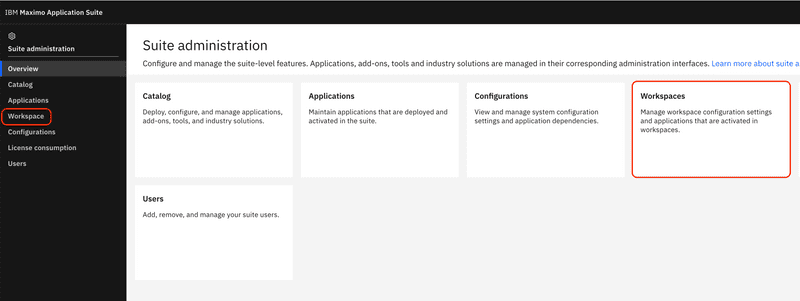
The process for importing a trusted CA certificate for MAS Manage is very different than WebSphere Traditional, since the CA certificate must be incorporated into the build and deploy process of the Manage container image. To add a new CA certificate to the Manage image, log into the IBM Maximo Application Suite > Suite administration site and from the left navigation menu select the Workspace menu item or the Workspaces tile.
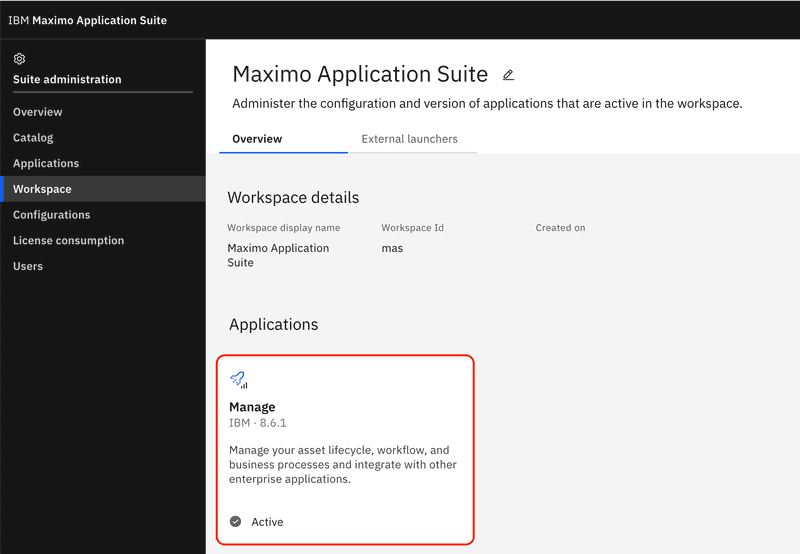
From the list of applications tiles select Manage. In our example below Manage is the only application installed, however your deployment may have additional applications to choose from.
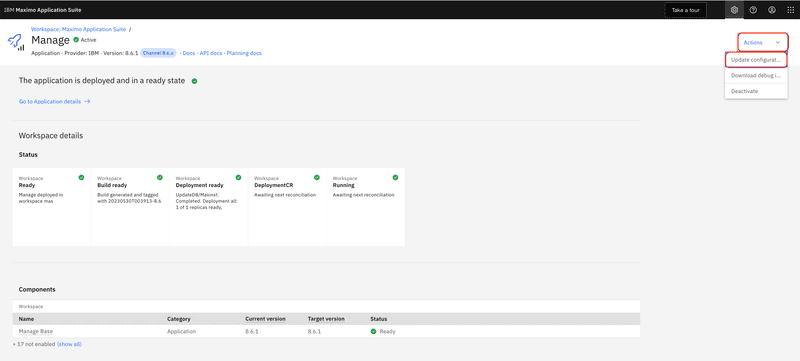
From the Actions menu select the Update configuration menu item.
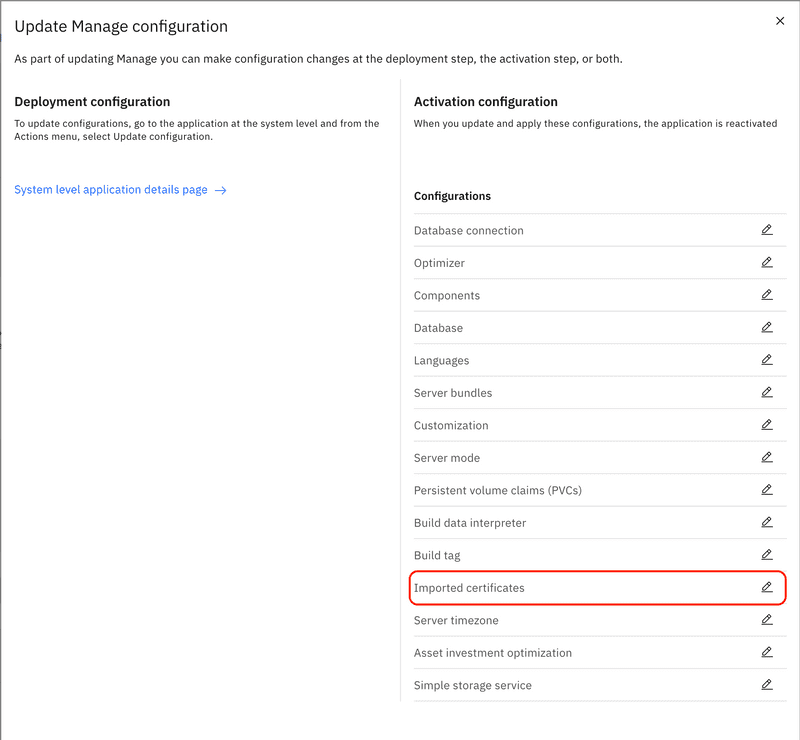
From the list of configuration options select the Import certificates item.
From the list of configuration item details select the Imported certificates section and uncheck the System managed switch.
Click the Add + button to add a new certificate.
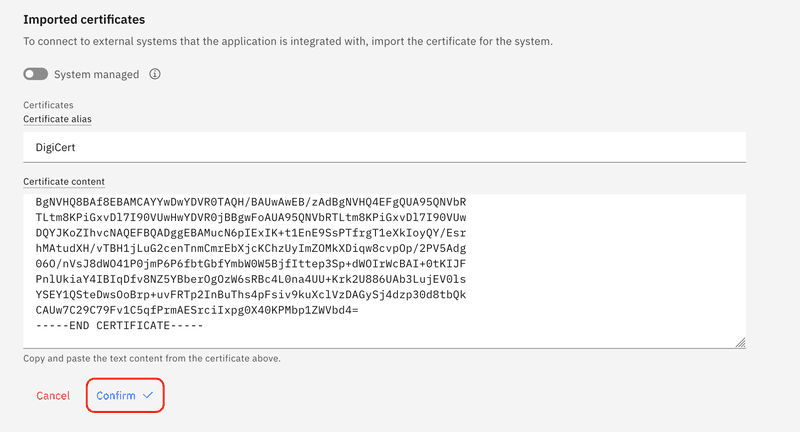
Enter DigiCert for the Certificate alias and then enter the PEM encoded certificate obtained in the previous section.
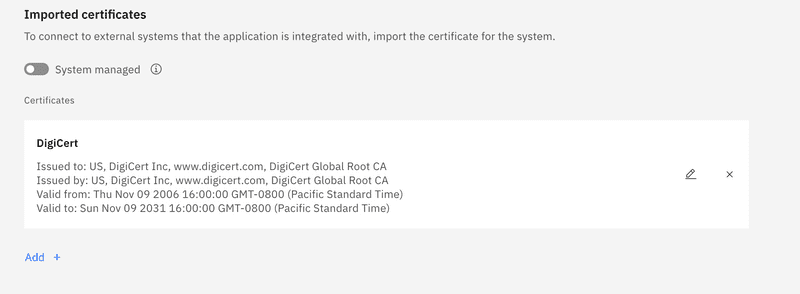
After confirming the certificate the certificate details will be displayed.
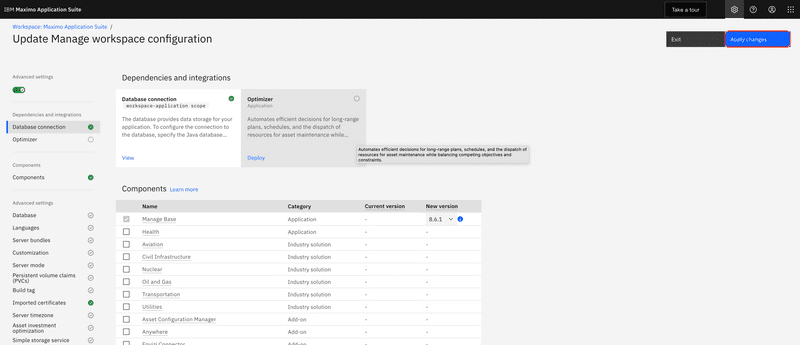
Finally, scroll back to the top of the screen and click the Apply changes button. This will trigger a rebuild of the Manage application container image, which can take up to 30 minutes to complete. Once the image has been built it will be deployed and the Manage application will be able to establish a secure connection to the external web service.
Final Thoughts
In this post we reviewed what a trusted CA certificate is and the role it plays in establishing a secure connection to secure external services. We discussed why it is important to use a secure connection when integrating with external systems. Finally we detailed the steps required to import a trusted CA certificate to the trust store for WebSphere Traditional and the Maximo Application Suite Manage application.
In future posts we will review connecting to external services and importing the external service CA certificates will be a prerequisite for using the examples. This post provides the step by step reference so we can start exploring the interesting ways Maximo can interact with other systems.
If you have any questions or comments please reach out to us at [email protected]
References
Wikipedia has a more in depth discussion of Certificate Authorities here.
For a broader discussion of cryptography and the principles upon which SSL/TLS is built I recommend Bruce Schneier's excellent book Applied Cryptography.
