Deploying with Azure DevOps Pipelines
November 7, 2023
Introduction
In our last post we examined how automation scripts are customizations that must be taken seriously, with proper development rigor. Part of that rigor includes reducing the number of manual touchpoints in a deployment, making releases predictable and repeatable. The best way to achieve that is using deployment pipelines to automate deploying automation scripts, screens, forms and other configurations.
Deployment pipelines provide a repeatable and definitive mechanism for migrating code and configurations from development, to test and production.
In this post we will walk step by step through configuring an Azure DevOps pipeline to deploy an automation script from a Git repository, triggered from a commit to the specified branch.
We are using Azure DevOps in our examples, but GitHub Actions or Bitbucket Pipelines have analogs for all the concepts we will discuss. If you have specific questions about either, or want to use something like Gitea (https://gitea.com) to self host you can reach out to us at [email protected]
Declaring Changes
As anyone who reads this blog or sees our answers on MORE (https://moremaximo.com/) or the IBM TechXchange (https://community.ibm.com/community/user/asset-facilities/communities/community-home), we have been promoting our VS Code extension for developing automation scripts for a couple years now and you may have noticed us mention the companion NPM package. You may have wondered why any of this mattered, why not just use Notepad++ and copy / paste scripts into Maximo, then use Migration Manager to move them to the next environment?
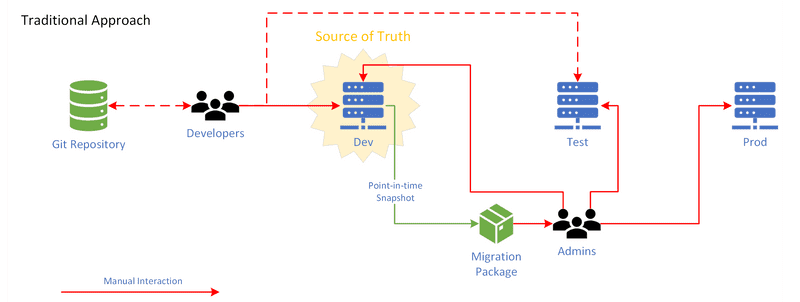
There are two reasons that this traditional approach breaks down. The first is simply the inefficiency and adhoc nature of that development flow. As soon as testing starts, most developers begin making changes directly in Maximo and from that point forward, Git no longer matches what is in Maximo and ceases being the definitive source of truth. It is simply too inefficient to iteratively make small changes in Notepad++ then copy and paste the whole script back into Maximo, then rinse repeat for every change from there on out.
The second is that a specific Maximo instance becomes the source of truth and not the Git repository. The code and configuration that should be included for a release is inferred from a point in time snapshot of that specific environment. Even worse, the build artifacts are not a full description of the desired state, but rather a manually cherry picked change set, that is valid for that very specific moment in time. This makes the release build entirely unrepeatable.
This process is visualized by the following diagram. The Git repository is relegated to a secondary source of truth loosely utilized by a group of developers and otherwise irrelevant to the organization. Whereas the Development environment becomes in practice, the source of truth. Implementing this process requires multiple manual touchpoints and provides numerous opportunities for failure.
Further complicating the process is the challenge of ensuring the extraction definition and timing are just right so you only get the changes you want and not other changes another developer made that you were unaware of. This becomes near impossible if there is more than one development environment and keeping everything in sync requires exponentially more effort and time.
Put simply, the standard process is complicated, inefficient and unreliable because it requires a multitude of human factors and manual coordination that all must be orchestrated perfectly. It encourages poor development habits and infers the desired state rather than enabling the developer to declare the intended configuration. It relegates Git to a secondary role, instead of being the source of truth as has been standard practice in the rest of the development community for over a decade.
The answer to these problems is our Maximo Development Tools VS Code Extension (https://marketplace.visualstudio.com/items?itemName=sharptree.maximo-script-deploy) that allow developers to declare not only the code, but also the configurations required by that code. This tooling takes the described configuration and applies it to a target environment. For example, if an automation script adds a new launch point and removes another, when that script is deployed the tooling uses the declared configuration to apply the defined launch points and remove any others not included in the declaration. Critically, this means that if someone manually adds a launch point and does not declare it in the script manifest it is removed from the next deployment.
We developed the VS Code extension to enable developer productivity and encourage better development practices. We then created a corresponding NPM package (https://www.npmjs.com/package/maximo-dev-tools) to provide the same functionality as the VS Code extension, but for a command line interface, enabling scripting and process automation.
Pipelines
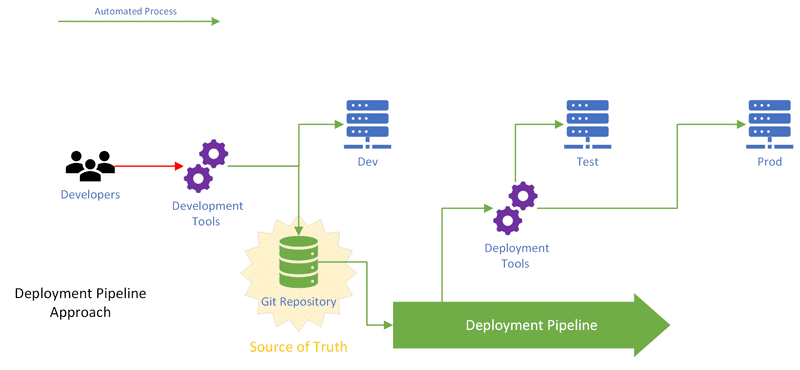
DevOps pipelines close the loop on the development process and remove the multiple manual steps traditionally required for migrating Maximo changes. In the pipeline model Git is the definitive source of truth for the Maximo configuration. By using pipelines a development process that demands rigor and declaration of what is included in the deployment is enforced. If a developer does not declare their changes and commit those changes to Git they are not migrated, ensuring that only those items intentionally committed to Git are migrated.
The VS Code extension and NPM command line tool are the keys to make using a pipeline possible.
Example
In the following example we will create a simple script and companion configuration that will be deployed to a development environment when it is pushed to the develop branch of our DevOps hosted Git repository. The same approach can then be applied to deploy to a test environment when pushing to a test branch or to production when pushing to the repository main branch. We use variables and variable groups so the same scripts and pipelines can be used when targeting different environments. It is outside the scope of this post, but DevOps pipelines support templating, publishing and many other capabilities we do not cover. We have intentionally kept this example simple as we assume for many people this is their first exposure to many of the concepts we are covering.
Full documentation for Azure DevOps Pipelines can be found here: https://learn.microsoft.com/en-us/azure/devops/pipelines/?view=azure-devops
Setup
For this example we will assume you have a Git repository, hosted with the Azure Git Repos service, which is part of Azure DevOps. The project will have a folder named scripts that contains the Maximo automation scripts to deploy. This example also assumes that you are working from a branch named develop.
The automation scripts must contain the scriptConfig variable with a deployment descriptor compatible with the Maximo Development Tools VS Code extension, which can be found here: https://marketplace.visualstudio.com/items?itemName=sharptree.maximo-script-deploy
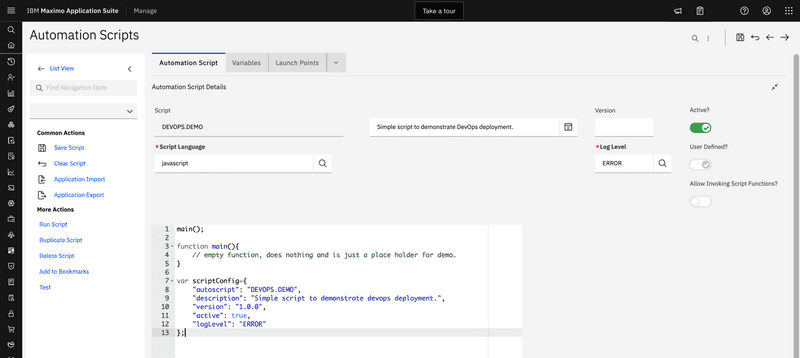
Below is a minimal example of a JavaScript automation script. Copy and save this automation script to your scripts folder as a file named devops-demo.js for use with the example pipeline.
main();function main() {// empty function, does nothing and is a place holder for demo.}var scriptConfig = {"autoscript": "DEVOPS.DEMO","description": "Simple script to demonstrate Azure DevOps deployment.","version": "1.0.0","active": true,"logLevel": "ERROR",};
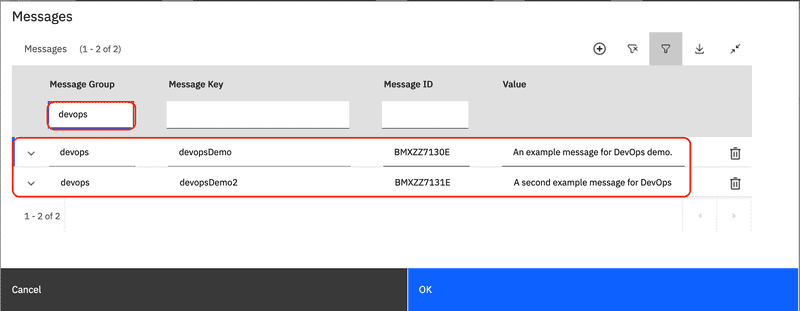
In addition to the automation script we will add a companion JSON configuration file that defines two new messages. Copy and save this JSON to your scripts folder as a file named devops-demo.json. Note that the name matches the script name, but with a .json extension. This allows the tooling to process the configuration file when the script is deployed.
A listing of the supported object schema is available here: https://github.com/sharptree/vscode-autoscript-deploy/tree/main/schemas
We are continuing to add support for additional Maximo objects. If you have a specific configuration type please contact us.
{"messages": [{"msgGroup": "devops","msgKey": "devopsDemo","value": "An example message for DevOps demo."},{"msgGroup": "devops","msgKey": "devopsDemo2","value": "A second example message for DevOps demo."}]}
API Key
Before we get to the pipeline itself we need to obtain an API key that will be used to communicate with Maximo.
Maximo 7.6
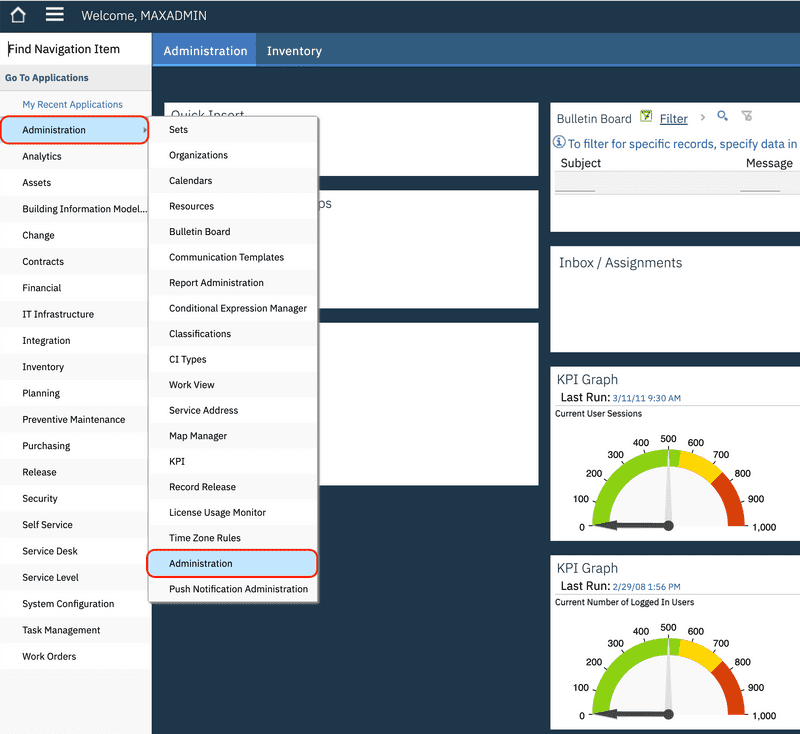
In Maximo 7.6 the API keys are managed in the Administration Work Center application. To access the application, select the Administration menu item and then select the Administration application.
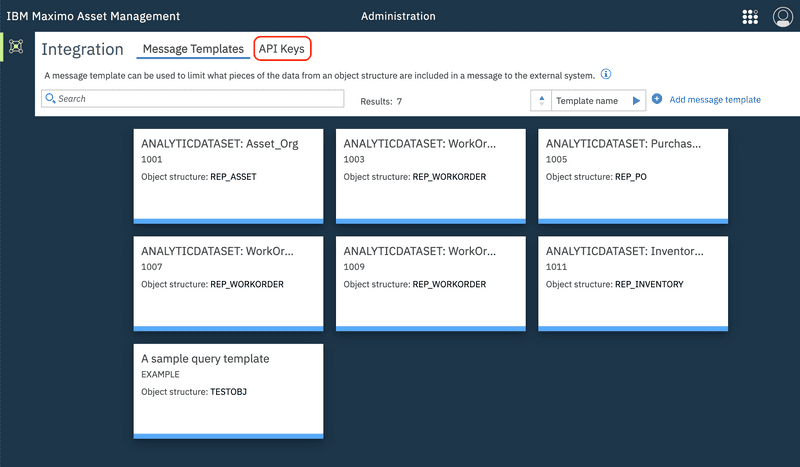
Once the application launches, select the API Keys link near the top of the screen.
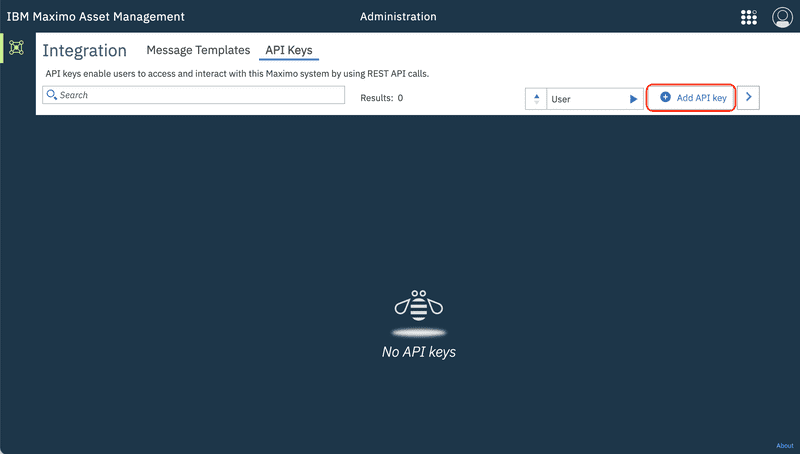
Click the Add API key button to add a new API key.
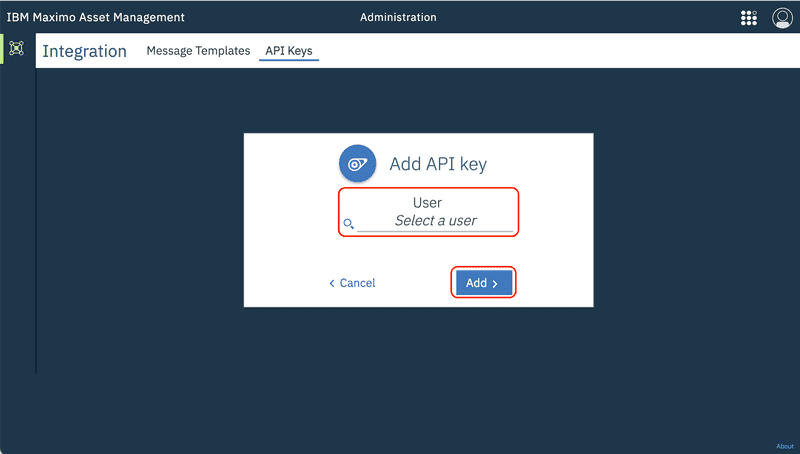
Enter the user that will be used by the pipeline to communicate with Maximo, then click the Add button. We recommend a dedicated system user for this purpose rather than using a person's user account.
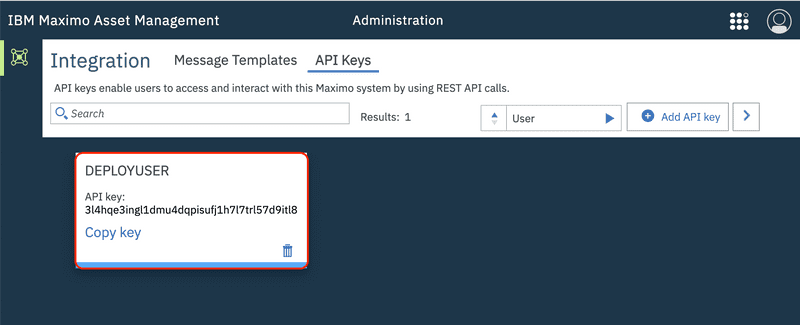
The user's API key will be displayed in a tile with the username.
Maximo Application Suite (MAS)
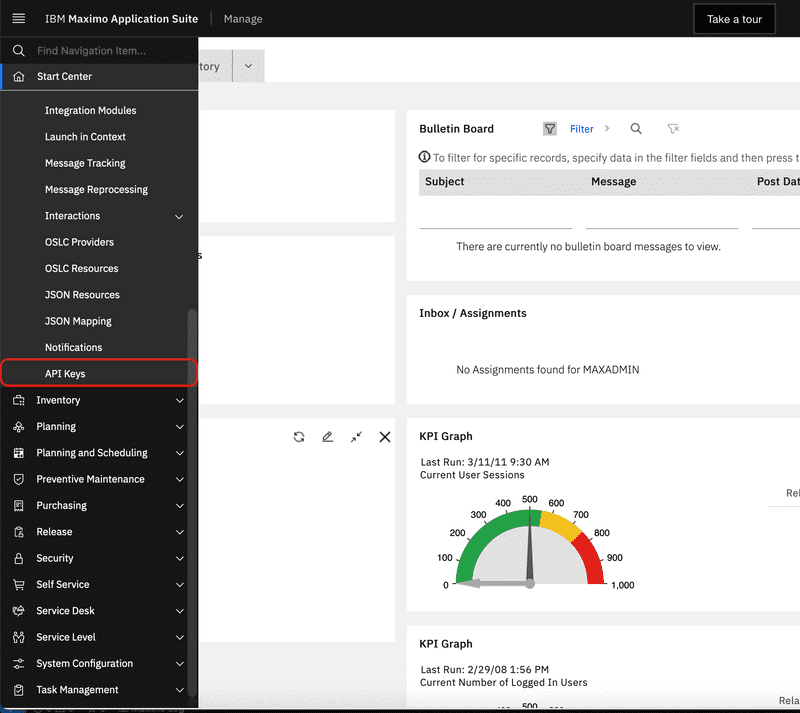
In MAS the API keys has a dedicated application. From the main navigation menu select the Integration menu item and then select the API Keys application.
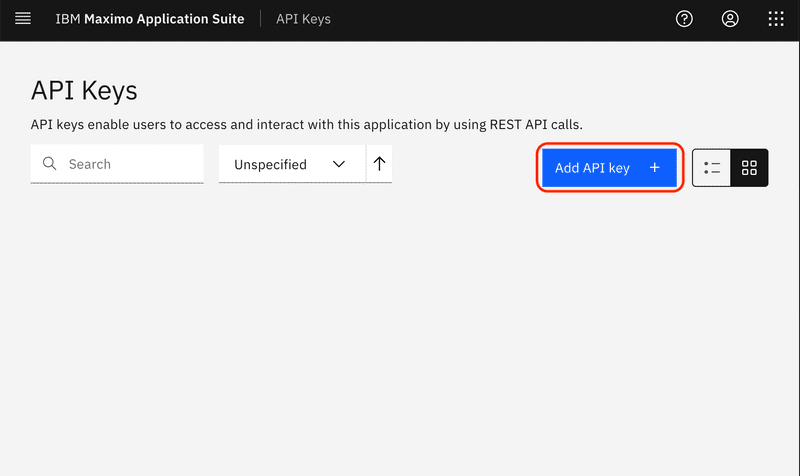
Click the Add API key button to create a new API key.
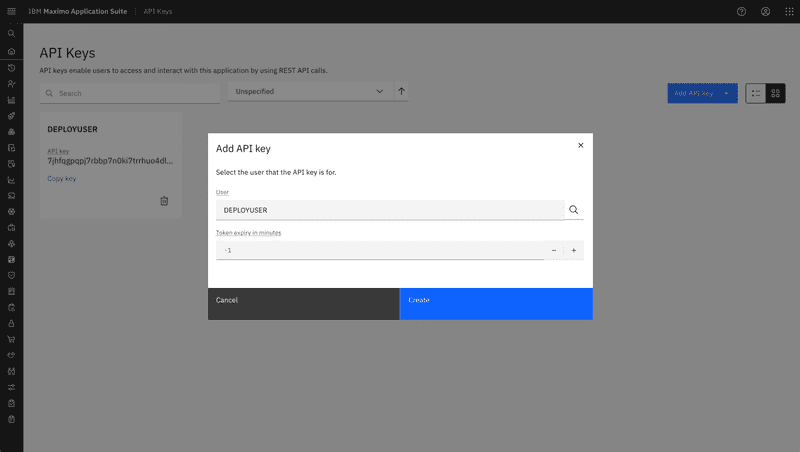
Enter the user that will be used by the pipeline to communicate with Maximo, then click the Add button. We recommend a dedicated system user for this purpose rather than using a person's user account.
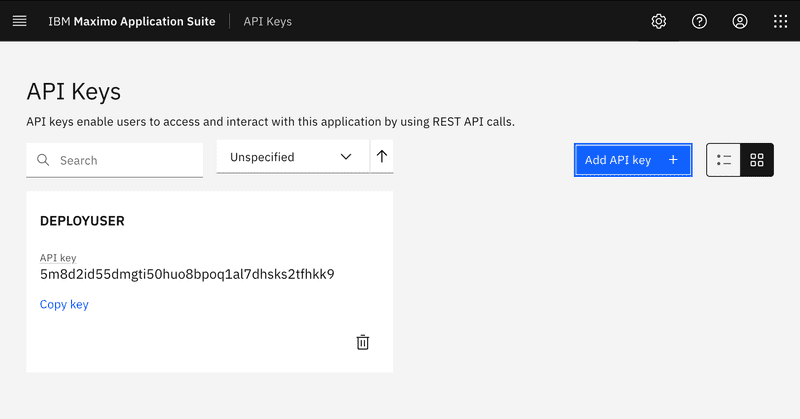
The user's API key will be displayed in a tile with the username.
Create Pipeline Library
Before we begin with the pipeline, we will to create a library of variables that will define the connection details and securely store the API key that was created in the previous section.
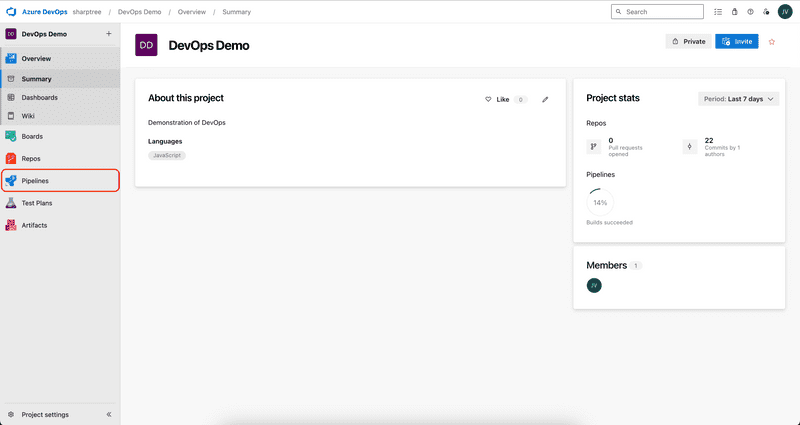
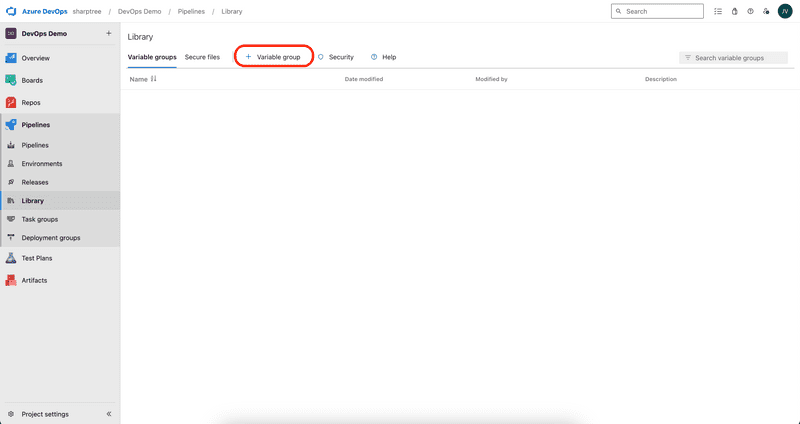
Login to Azure DevOps and select your project. We have created a project named DevOps Demo, which can be seen in the image below. From the main navigation menu on the left, select the Pipelines option.
Click the + Variable group button to create a new variable group.
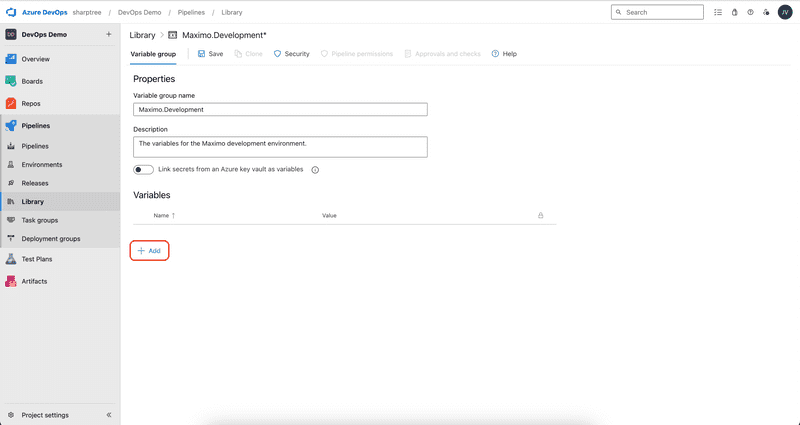
For the Variable group name we follow the Microsoft variable naming standard of capitalized names separated by periods. In this example we will deploy to the Maximo Development environment so we will name the library Maximo.Development, then enter a description for the variable group. Next we will click the + Add button to create the first variable.
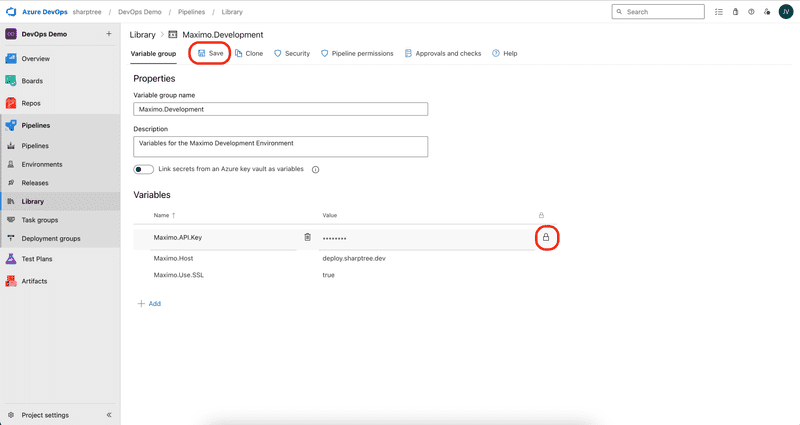
Add the following variables and then click the padlock icon for the Maximo.API.Key to make the value secure and not visible.
| Variable | Description |
|---|---|
| Maximo.API.Key | The Maximo API access key. |
| Maximo.Host | The host name for the target Maximo instance. |
| Maximo.Use.SSL | Indicates if the Maximo instance is using SSL. |
When all the variables have been added with values for your development environment and the Maximo.API.Key variable has been secured, click the Save button.
Deployment
There are two scenarios we are going to cover, one where Maximo is publicly available and Azure DevOps can reach the instance and the other where Maximo is behind a firewall, in which case we will use an agent deployment. If your Maximo instance is behind a firewall follow the steps in the Agent Deployment section, otherwise proceed to the Create Pipeline section.
Agent Deployment
In cases where Maximo is behind a corporate firewall a new Pipelines Environment can be registered and used within the pipeline. In the following steps we will create a new Environment and register a deployment server resource behind the firewall with the Environment, tag it for use and then modify our pipeline YAML to use the new Environment resource.
Create Environment
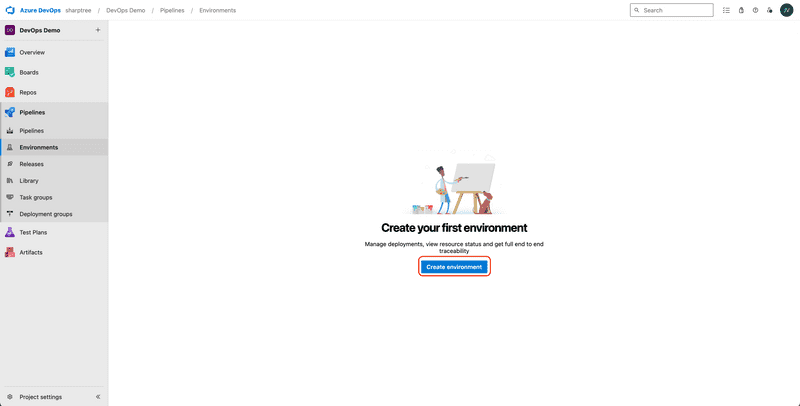
Login to Azure DevOps and select your project. Then under Pipelines, select the Environments menu item and click the Create environment button.
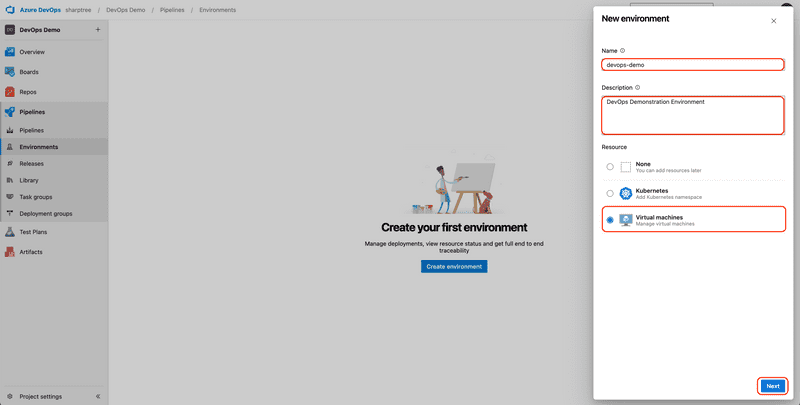
Enter a value in the Name field, we have entered devops-demo, provide a Description such as DevOps Demonstration Environment, select Virtual machines as the Resource type and then click the Next button.
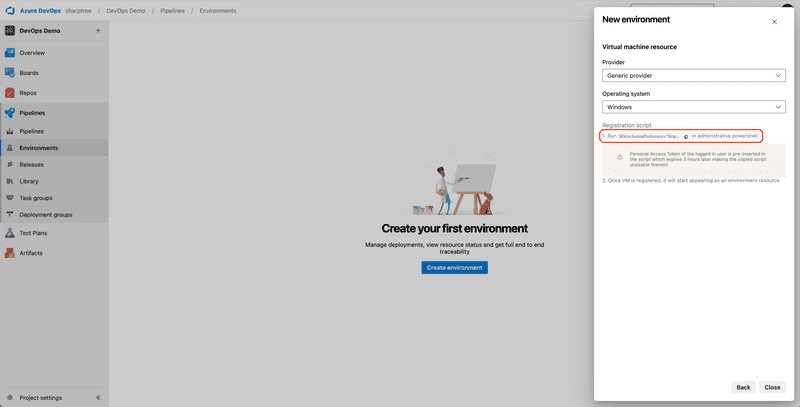
For our example we will register a Windows server as our deployment resource, but you may follow the same procedure in Linux. Click the Registration script to copy the script to the system clipboard. Note the security warning that this script contains a privileged Personal Access Token and should not be shared.
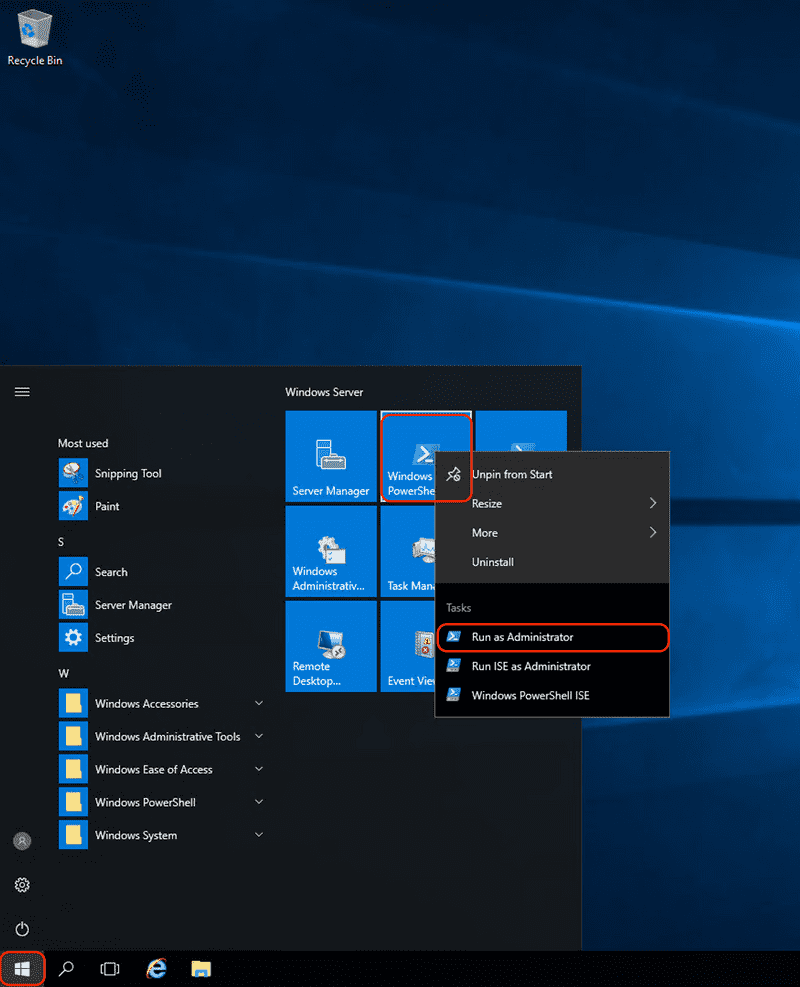
Login to the Windows server that is behind the corporate firewall and that will be used by the deployment pipeline. Click the Windows menu and then right click on the Windows Powershell icon and select Run as Administrator.
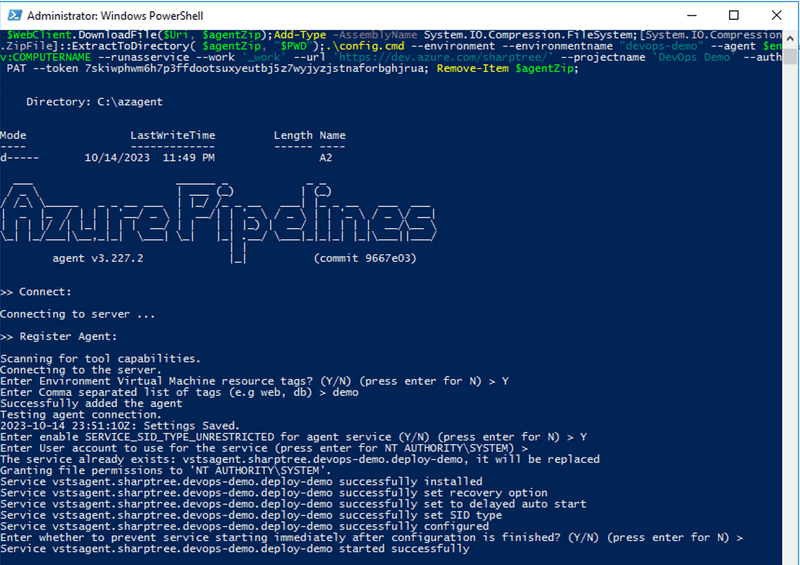
Paste the script that was copied from the previous step and follow the prompts. Note that it may take several minutes for the process to complete before being prompted for any input. When prompted with Enter Environment Virtual Machine resource tags? (Y/N), enter Y and press Enter. When then prompted to Enter Comma separated list of tags (e.g web, db) > enter the value of demo and press Enter. Accept the default values for the remaining prompts.
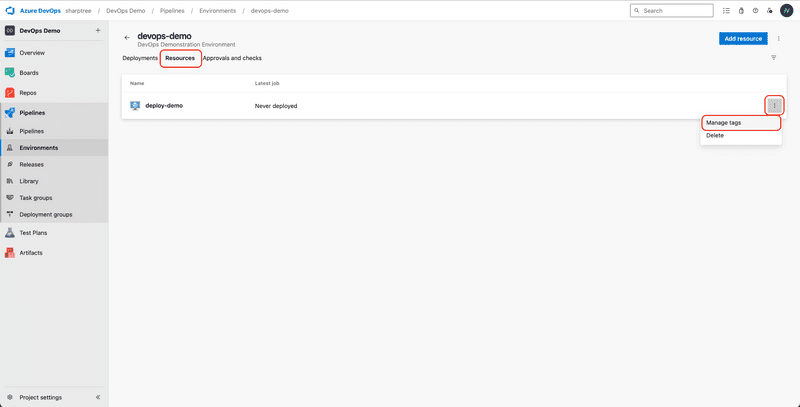
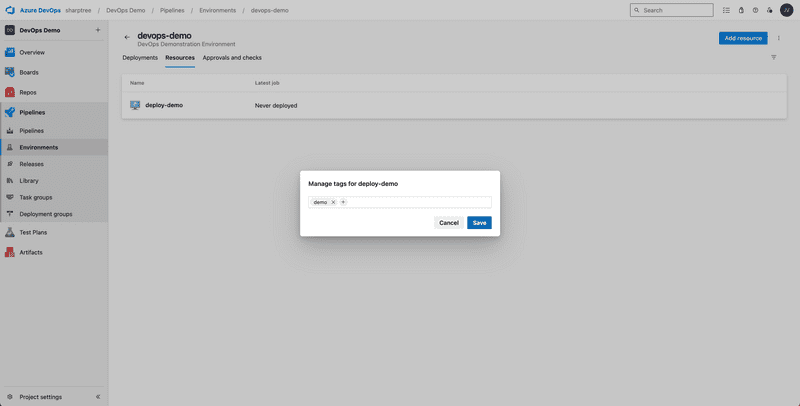
Return to Azure DevOps and click the Resources tab. The server that you ran the script on is now registered as a resource in the Environment. Click the three dots on the right of the entry and then click the Manage Tags menu item to confirm that the tag demo was successfully added to the resource.
Verify that the tag demo is associated with the resource.
Create Pipeline
Create a new file named azure.pipelines.develop.yaml in root of your repository folder structure, then copy the contents of the YAML below to the file, either Direct Deploy or Agent Deploy depending on your environment, and then save the file.
The pipeline YAML file may be located in any folder and be named anything that makes sense to you. For our example we have kept it clear and simple by having the pipeline YAML be in the root folder and by using a name that clearly identifies it as an Azure pipeline file for development.
In the example below the trigger entry refers to branch that will trigger updates when a commit is pushed to the DevOps remote, for this example it is a branch named develop. If you are using a different branch naming convention adjust the trigger to match your development branch name.
This example is very simple for the purpose of clarity. If you have more sophisticated requirements you can review the full Microsoft documentation here:https://learn.microsoft.com/en-us/azure/devops/pipelines/tasks/reference/?view=azure-pipelines
Direct Deploy
# CI Pipeline for Development buildstrigger:# Triggered from commit to the develop branch.- develop# Variables used through the script.variables:# Maximo.Development variables are imported from the Pipeline Library and define the target host.- group: Maximo.Development# Package version is defined on the commit rather as it changes frequently.- name: Package.Versionvalue: 1.0.0# Use an ubuntu image as the starting point on Azure DevOps platform.pool:vmImage: ubuntu-lateststeps:# Check out the repository for the current trigger (develop/test/main)- checkout: selfsubmodules: truepersistCredentials: true# Install Node 18- task: NodeTool@0inputs:versionSpec: 'v18.15.0'displayName: Install Node# Install the maximo-dev-tools from NPM- task: Npm@1inputs:command: 'custom'customCommand: 'install -g maximo-dev-tools'displayName: Install Maximo Dev Tools# Run the maximo-dev-tools to deploy the scripts in the script directory. Note that additional calls can be made to deploy screens and forms.- script: maximo-dev-tools deploy -a $(Maximo.API.Key) -h $(Maximo.Host) -d $(System.DefaultWorkingDirectory)/scripts --ssl $(Maximo.Use.SSL)displayName: Deploy Scripts
Agent Deployment
# CI Pipeline for Development buildstrigger:# Triggered from commit to the develop branch.- develop# Variables used through the script.variables:# Maximo.Development variables are imported from the Pipeline Library and define the target host.- group: Maximo.Development# Package version is defined on the commit rather than the library as it changes frequently.- name: Package.Versionvalue: 1.0.0jobs:# Define the deployment name.- deployment: DemoDeploydisplayName: DevOps Demo# Use an ubuntu image as the starting point on Azure DevOps platform.pool:vmImage: ubuntu-latest# Specific the devops-demo environment, which is a server inside the firewall running the Azure DevOps agent.environment:name: devops-demoresourceType: VirtualMachine# Target the machine tagged as "demo", this could be dev/test/prod depending on your environment.tags: demo# Run the common pipeline parts, this includes checking out code to the environment, installing node and deploying.strategy:runOnce:deploy:steps:# Check out the repository for the current trigger (develop/test/main)- checkout: selfsubmodules: truepersistCredentials: true# Install Node 18- task: NodeTool@0inputs:versionSpec: 'v18.15.0'displayName: Install Node# Install the maximo-dev-tools from NPM- task: Npm@1inputs:command: 'custom'customCommand: 'install -g maximo-dev-tools'displayName: Install Maximo Dev Tools# Run the maximo-dev-tools to deploy the scripts in the script directory. Note that additional calls can be made to deploy screens and forms.- script: maximo-dev-tools deploy -a $(Maximo.API.Key) -h $(Maximo.Host) -d $(System.DefaultWorkingDirectory)/scripts --ssl $(Maximo.Use.SSL)displayName: Deploy Scripts
Commit the file using your Git tool of choice. We really like GitKraken (https://www.gitkraken.com/), but sometimes the tool you are comfortable with is the best tool.
Finally, push your change the to the remote Azure DevOps repository.
Create and Run the Pipeline
In Azure DevOps select your project again and then select Pipelines navigation menu item.
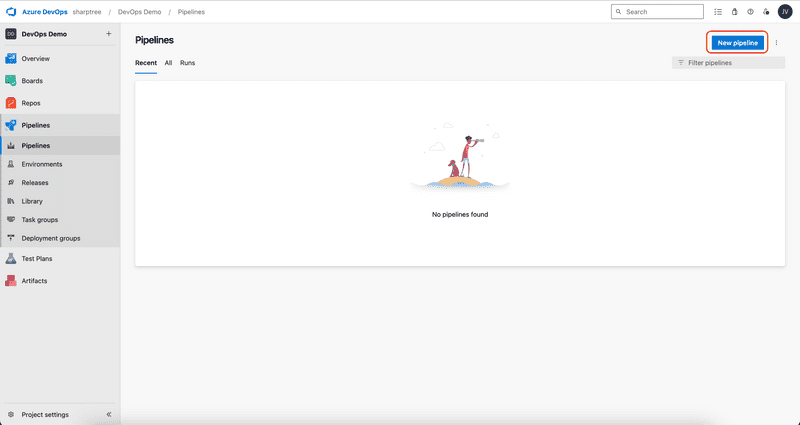
Click the New pipeline button to start the process of creating a new pipeline.
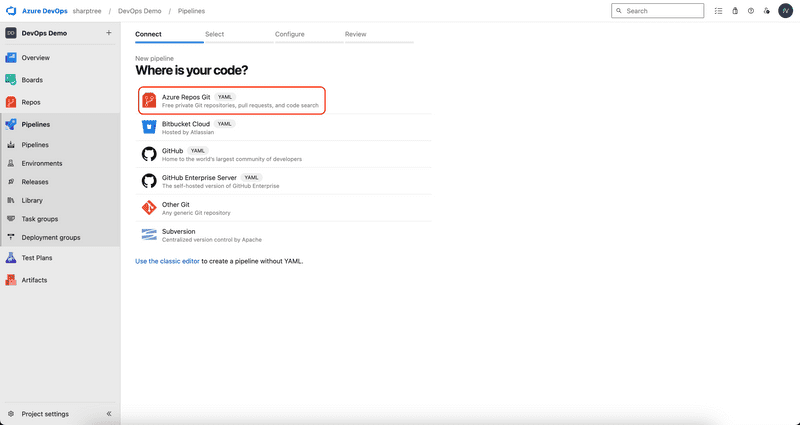
You can use Azure DevOps to run pipelines from Git repositories hosted with other services, but we are going to assume that Azure is also where the repository is hosted, so select Azure Repos Git.
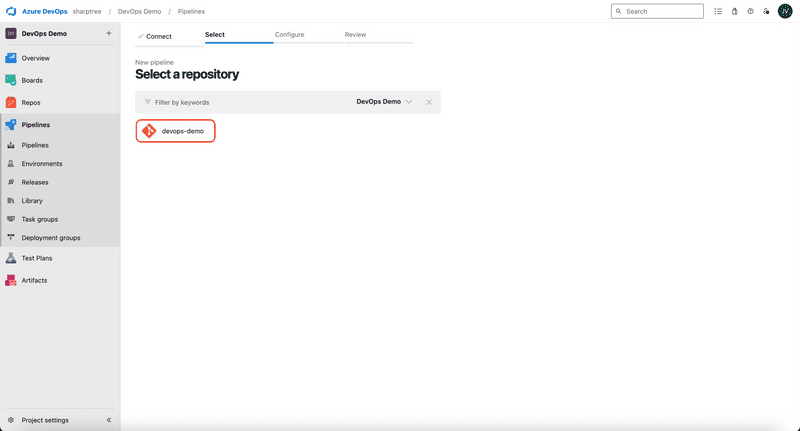
Next, select the repository to apply the new pipeline to. The current project repositories are listed and you select the repository by clicking it. In our demonstration our repository is named devops-demo.
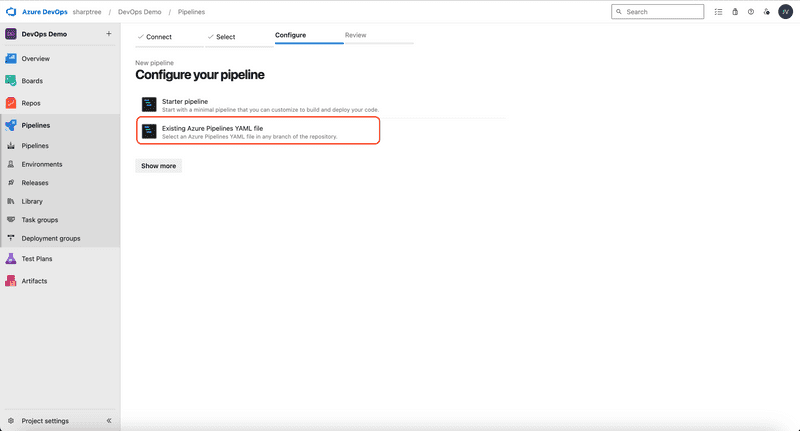
Since we have already created and committed our pipeline YAML we will select the Select an existing YAML file option.
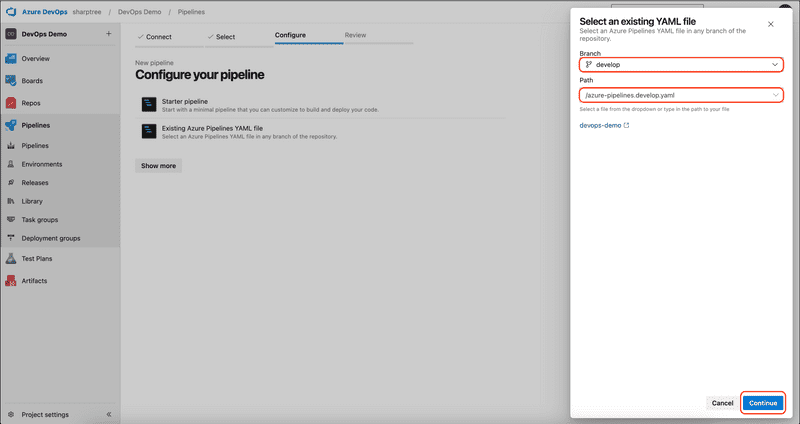
Select the develop branch and then select /azure-pipelines.develop.yaml file that was created and pushed to the Azure Git Repository in the previous step, then click the Continue button.
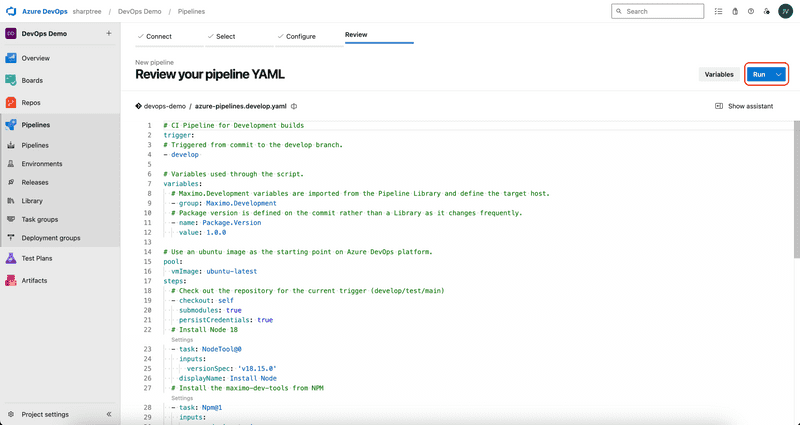
Review the pipeline YAML file, it should match the file that was created and pushed in the early step, then click the Run button to create and run the pipeline.
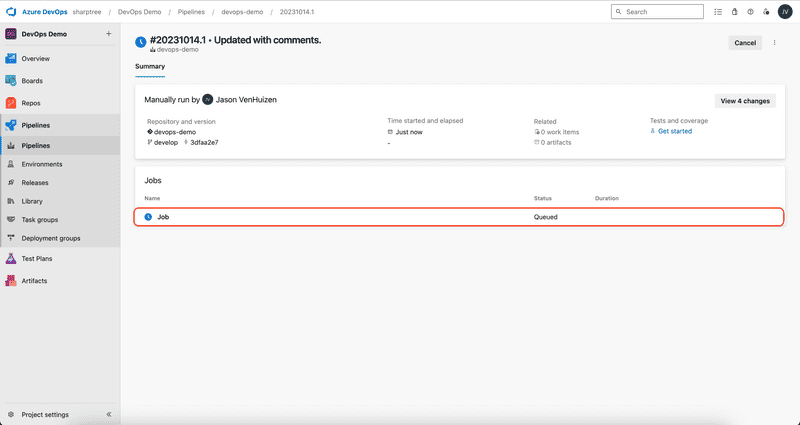
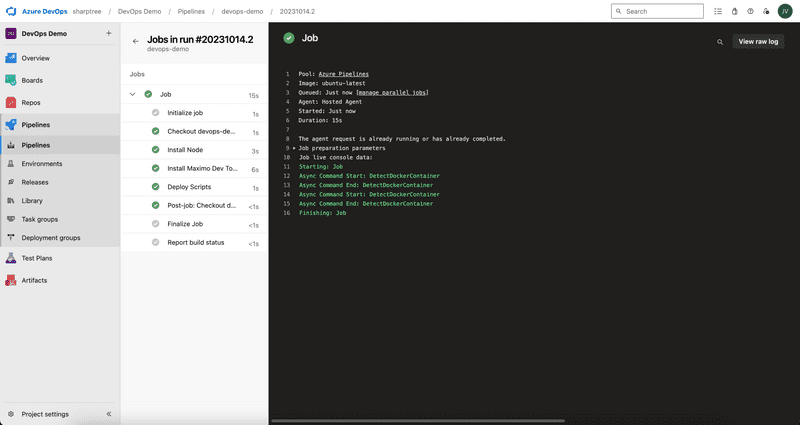
The pipeline is created and a Job is queued to run. Click the Job to view the details of the Job execution.
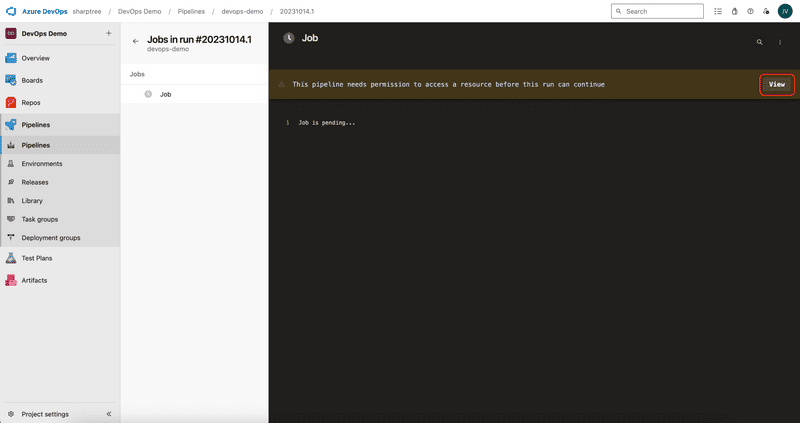
When the pipeline first runs a message is displayed stating the that pipeline needs permission to access a resource before the run can continue. Click the View button to view the required permissions.
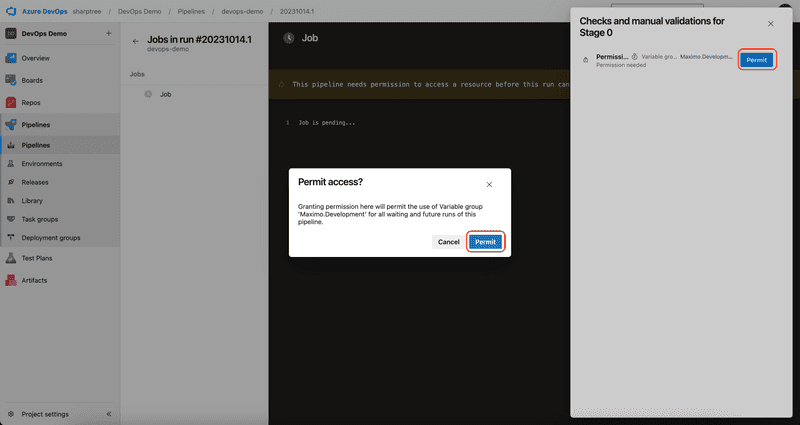
The pipeline needs access to the Maximo Development variable Library that was created in the previous section. Click the Permit button and then click Permit again to confirm granting access to the Maximo Development variable Library.
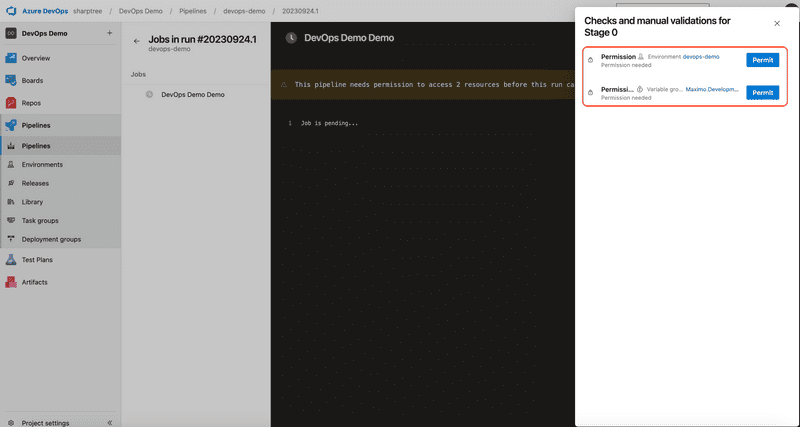
If using an Agent deployment an additional permission is required to access the Environment Resource. Click the Permit button on each to grant permissions.
The Job will run and execute the following steps:
- Create a new Ubuntu runtime container to execute the pipeline
- Check out the Git repository develop branch to the container
- Install Node version 18
- Install the latest version of the Maximo Dev Tools https://www.npmjs.com/package/maximo-dev-tools from NPM.
- Deploy the scripts found in the
scriptsfolder to the Maximo host specified in the Maximo Development variable Library using the API Key provided.
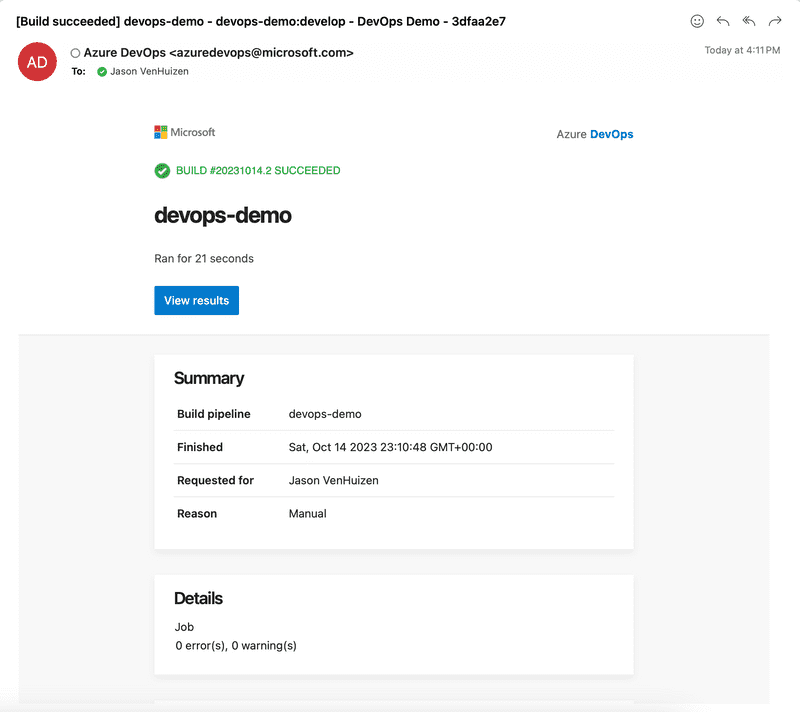
An email will be sent to the user who initiated the pipeline run, confirming the status of the pipeline run, either succeeded or failed. In our example, the pipeline run was successful so we received the succeeded notification.
Confirm the Script and Configuration in Maximo
To confirm the script was deployed, from the main navigation menu select System Configuration then Platform Configuration and then the Automation Scripts application. Search for the example script DEVOPS.DEMO and confirm that the script was successfully deployed.
To confirm that the corresponding message configurations were applied, from the main navigation menu select System Configuration then Platform Configuration and then the Database Configuration application. From More Action menu select Messages. Filter the Message Group column to devops and confirm that there are two messages for the devops message group.
Final Thoughts
The traditional process of copying automation scripts and other configurations between environments creates the opportunity for confusion and mistakes during the deployment. Since it relies on a manual process it is prone to variation and non-reproducible outcomes. It allows bypassing Git and source control and makes the development environment the source of truth for system configurations, all of which is highly undesirable.
Sharptree has developed the Maximo Developer Tools VS Code extension and corresponding NPM Maximo Developer Tools package to unify the process of developing Maximo automation scripts and corresponding configurations and deploying and promoting those changes through a Git centered process. In this post we provided a step by step guide for setting up and running an Azure DevOps Pipeline. Using pipelines removes the need for manual touchpoints when deploying Maximo configuration changes and encourages proper version control and source management practices.
If you have any questions, comments or have suggestions for topics you would like to see us cover, please reach out to us at [email protected]
