Implementing Server-Sent Events (SSE) in Maximo
July 9, 2024
Introduction
Sometimes you want to be notified in realtime when an event occurs in Maximo. You may do this through a Maximo Integration Framework Publish Channel, but that requires that you have a service listening for updates and that Maximo has access to that service. In a mobile context you may use push notifications, but that requires use of a 3rd party service and typically is not not guaranteed to be realtime. You could potentially implement a WebSocket, but that is complicated and requires special networking configurations to support the web socket protocol.
Another option, which we will cover in this post, is to implement Server-Sent Events (SSE) in an automation script. SSE provides a form of long poll streaming, where a client connects to a service and then receives a stream of updates from the server. This can be used to monitor a long running data process, receive updates on a database configuration or even report on specific events such as a work order being generated against a critical asset.
Server-Sent Events are a very old technology, first described in 2004 and then adopted in 2006. The benefit of this age is that SSE client support is provided by all the major web browsers, NodeJS, Python, Java and many other languages. Additionally, tools like Postman (https://postman.io) provide native support for developing and testing SSE as we will see later in this post.
This widespread adoption makes implementing client code relatively easy, with documentation and examples plentiful. Although SSE does not provide a bidirectional communication channel, the relative simplicity of SSE often makes it an excellent choice to provide a pure HTTP solution for realtime notifications. This means SSE works transparently with reverse proxies, and supports standard compression, multiplexing and security mechanisms such as CORS.
The official specification for SSE is found here: https://html.spec.whatwg.org/multipage/server-sent-events.html#server-sent-events
In this post we will implement an example SSE service endpoint using a Maximo automation script that provides a random stream of create, update and delete events, one every every second.
This post includes implementing a Java
java.lang.Runnableinstance to run a background thread that generates events. If you are unfamiliar with implementing Java classes in an automation script, check out our Creating Custom Classes in Automation Scripts post for a full discussion.
Server-Sent Events
SSE is a great choice for situations where you need a client initiated, low-latency, unidirectional channel from the server to the client. This means that communication from the client back to the server must happen on another channel, but this is often desirable as the client often uses the SSE message as a trigger to perform additional actions.
Message Structure
SSE messages are very simple. They use the text/event-stream Content-Type and a UTF-8 encoded text message containing colon separated key-value pair fields and are terminated with two new line characters. There are four defined fields for the message, which are detained in the table below. The event and data fields are required and the data field may be included multiple times in a message. The id and retry fields are optional.
| Field | Description |
|---|---|
| id | A unique value to identify the message, typically a sequential integer value. This value is used with the Last-Event-ID HTTP request header to allow the server to send messages that may have been missed while the client was disconnected. |
| event | A text value that identifies the message type. |
| data | The message payload, which can be structured or unstructured text. This is often embedded JSON data as it is in our example. |
| retry | The number of seconds a client should wait before attempting to retry a connection. |
Below is an example of two sequential SSE messages, one an update and the other a delete. The id field identifies the sequence they were sent and the data is JSON embedded in the message. The retry field indicates that the client should retry after 10 seconds if disconnected.
id: 0event: updatedata: {"counter":1,"serverTime":1720390503817}retry: 10id: 1event: deletedata: {"counter":2,"serverTime":1720390504819}retry: 10
One final note, is if the server returns a HTTP 204 No Content response, this is indicates a forceful disconnect and the client should not attempt to reconnect.
Implementing Server-Sent Events
Implementing SSE in an automation script is surprisingly simple. All we need to do is get a reference to the HTTPServletResponse output stream from the implicit request object and implement a background thread to write events to the output stream. One key point is that the we must also set the Content-Type header to text/event-stream, set the Connection header to keep-alive, the Cache-Control header to no-cache and finally we must flush the output stream buffer to commit the headers to the client.
Maximo by default sets the
Content-Typeheader for all automation script HTTP responses toapplication/jsonand will overwrite any value set in the automation script. However, by callingflushBuffer()on theHTTPServletResponsethe response headers are committed to the client and cannot be updated. This prevents Maximo from overwriting theContent-Typeheader, although you may see the warning message "SRVE8094W: WARNING: Cannot set header. Response already committed" in the log. This is an informational warning and does not impact the server performance.
Example
The following example uses the Java java.util.Random class to select a random event type from the eventTypes array and then send a message with the current server time once a second. An optional count request query parameter can be provided to specify the number or messages to send, which defaults to 10 if a value is not provided.
If we encounter a java.io.IOException exception while writing to the output stream we can use this to detect that a client has disconnected. This is good practice and allows us to clean up resources that were being used to stream events to the client, in our case it terminates the producer thread.
For convenience we have implemented a ServerSentEvent class to hold the id, event and data elements and a sse() function to concatenate the values, add the two new line characters (\n\n) and then return the result as a UTF-8 encoded byte array.
The example provides a scriptConfig object so it can be deployed using the Sharptree Maximo Developer Tools extension for VS Code, which can be found here: https://marketplace.visualstudio.com/items?itemName=sharptree.maximo-script-deploy . If you are still copy and pasting code into Maximo, take a moment to check it out as it will save you an a lot of time and effort.
Javascript
var Runnable = Java.type("java.lang.Runnable");var JavaString = Java.type("java.lang.String");var System = Java.type("java.lang.System");var Thread = Java.type("java.lang.Thread");var Random = Java.type("java.util.Random");// example events in an array.var eventTypes = ["save", "update", "delete"];main();function main() {if (typeof request !== "undefined") {// get a reference to the HTTPServletResponse object.var response = request.getHttpServletResponse();// set the buffer to zero so messages are immediately sent to the client.response.setBufferSize(0);// set the response type as text/event-stream to indicate that an event stream is being sent.response.setContentType("text/event-stream");// indicate that the connection should be kept aliveresponse.addHeader("Connection", "keep-alive");// indicate to the client that the cache should not be used.response.addHeader("Cache-Control", "no-cache");// flush the buffer to send and commit the headersresponse.flushBuffer();// get the output stream for the response.var outputStream = response.getOutputStream();// get the count of events to send from the query parameter or default to 10.var count = request.getQueryParam("count") || 10;// define a java.lang.Runnable that will generate random events.var EventGenerator = Java.extend(Runnable, {run: function () {try {var random = new Random();// Simple for loop to generate events, one a second.var id = 0;for (var i = 0; i < count; i++) {// Generate a random index and get the random event typevar randomIndex = random.nextInt(eventTypes.length);var eventType = eventTypes[randomIndex];// A payload for the data field that returns the counter and current time.var data = {"counter": i + 1,"serverTime": System.currentTimeMillis()};// Create a new ServerSentEvent object as defined at the bottom of the script.var sseEvent = new ServerSentEvent(i, eventType, JSON.stringify(data));// Call the sse() function on the sseEvent object to generate a SSE formatted String and convert that to a UTF-8 byte array.outputStream.write(sseEvent.sse());outputStream.flush();// sleep one second between messagesThread.sleep(1000);}} catch (error) {// if the error is a Java IOException, ignore it because that means the client disconnected.if (!(error instanceof Java.type("java.io.IOException"))) {System.out.println(error);}}}});// create and start a new thread to run the EventGeneratorvar thread = new Thread(new EventGenerator());thread.start();// Join the generator to wait for the thread to completesthread.join();}}// ServerSentEvent object to represent a Server Sent Event. The sse function formats the event as a UTF-8 byte array for sending to the clientfunction ServerSentEvent(id, event, data) {this.id = id;this.event = event;this.data = data;this.sse = function () {return new JavaString("id: " + this.id + "\n" + "event: " + this.event + "\n" + "data: " + this.data + "\n\n").getBytes("UTF-8");};}// Nashorn is ES5 compliant so we need to define the prototype for the ServerSentEvent object// create a new prototype object for the ServerSentEvent objectServerSentEvent.prototype = Object.create(Object.prototype);// assign the ServerSentEvent function as the constructor for the ServerSentEvent prototypeServerSentEvent.prototype.constructor = ServerSentEvent;var scriptConfig = {"autoscript": "SSE","description": "Server Side Events","version": "1.0.0","active": true,"logLevel": "ERROR"};
Jython
from java.lang import Runnable, String, System, Threadfrom java.io import IOExceptionfrom java.util import RandomeventTypes = ["save", "update", "delete"]# ServerSentEvent object to represent a Server Sent Event. The sse function formats the event as a UTF-8 byte array for sending to the clientclass ServerSentEvent(object):id = 0event = "save"data = ""def __init__(self, id, event, data):self.id = idself.event = eventself.data = datadef sse(self):return String("id: " + str(self.id) + "\n" + "event: " + self.event + "\n" + "data: " + self.data + "\n\n").getBytes("UTF-8")def main():if 'request' in globals():# get a reference to the HTTPServletResponse object.response = request.getHttpServletResponse()# set the buffer to zero so messages are immediately sent to the client.response.setBufferSize(0)# set the response type as text/event-stream to indicate that an event stream is being sent.response.setContentType("text/event-stream")# indicate that the connection should be kept aliveresponse.addHeader("Connection", "keep-alive")# indicate to the client that the cache should not be used.response.addHeader("Cache-Control", "no-cache")# flush the buffer to send and commit the headersresponse.flushBuffer()# get the output stream for the response.outputStream = response.getOutputStream()# get the count of events to send from the query parameter or default to 10.count = int(request.getQueryParam("count") or 10)# define a java.lang.Runnable that will generate random events.class EventGenerator(Runnable):def run(self):try:random = Random()# Simple for loop to generate events, one a second.id = 0i = 0while i < count:# Generate a random index and get the random event typerandomIndex = random.nextInt(len(eventTypes))eventType = eventTypes[randomIndex]# A payload for the data field that returns the counter and current time.data = """{"counter": """ + str(i + 1) + ""","serverTime": """ + str(System.currentTimeMillis()) + """}"""# Create a new ServerSentEvent object as defined at the bottom of the script.sseEvent = ServerSentEvent(i, eventType, data)# Call the sse() function on the sseEvent object to generate a SSE formatted String and convert that to a UTF-8 byte array.outputStream.write(sseEvent.sse())outputStream.flush()# sleep one second between messagesThread.sleep(1000)i = i + 1except Throwable as error:if not isinstance(error, IOException):System.out.println(error)# create and start a new thread to run the EventGeneratorthread = Thread( EventGenerator())thread.start()# Join the generator to wait for the thread to completesthread.join();main()scriptConfig="""{"autoscript": "SSE.PY","description": "Server Side Events","version": "1.0.0","active": true,"logLevel": "ERROR"}"""
Testing with Postman
Postman is a fantastic tool for interacting with and testing HTTP based services. Fortunately, Postman also has support for SSE endpoints that lets you test and view your newly created SSE service script.
More information about Postman's support for SSE can be found here: https://blog.postman.com/support-for-server-sent-events/
The following assumes familiarity configuring Postman to communicate with Maximo. If you need details for configuring Postman for Maximo please see Appendix: Configuring Maximo Authentication for Postman at the end of this post for step by step instructions for creating an API Key or generating the Maxauth header.
API Key
In Postman create a new request and enter the URL for your Maximo instance with the api/script/sse, where sse is the name of the automation script you created earlier, for example https://mas.manage.mas.apps.sharptree.dev/maximo/api/script/sse. Then click on the Headers tab and enter apikey for the name of the header and the apikey value from Maximo.
Maxauth
In Postman create a new request and enter the URL for your Maximo instance with the oslc/script/sse, where sse is the name of the automation script you created earlier, for example https://maximo.sharptree.dev/maximo/oslc/script/sse. Then click on the Headers tab and enter maxauth for the name of the header and the base64 encoded Maxauth value as the value.
Test SSE Endpoint
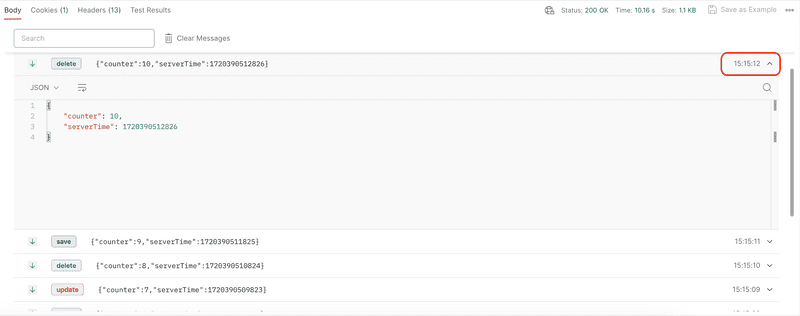
Once you have set up the Postman authentication, click the Send button to send your request. You will see the server respond with something similar to the image below. You can click the highlighted caret to view the response detail, which in this case is a JSON formatted payload.
Note the random event types of create, update and delete that are returned along with the counter and server time. This is a simple example, but hopefully provides a solid demonstration of what is possible with SSE.
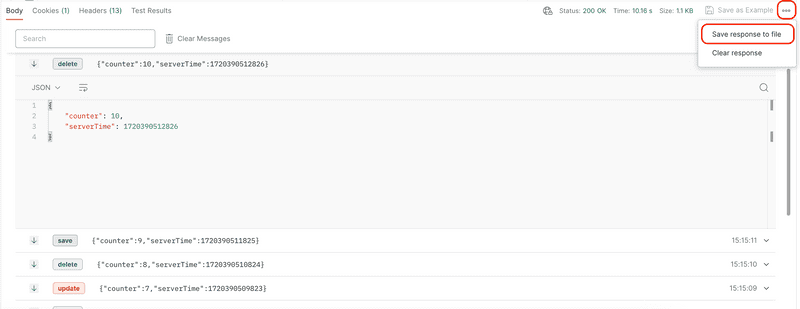
To view the raw messages from the server click the three dots at the top right of the window and select Save response to file and then specify the file to save to.
The contents of the file will look similar to the example below.
id: 0event: updatedata: {"counter":1,"serverTime":1720390503817}id: 1event: deletedata: {"counter":2,"serverTime":1720390504819}id: 2event: updatedata: {"counter":3,"serverTime":1720390505820}id: 3event: savedata: {"counter":4,"serverTime":1720390506821} …
Final Thoughts
Server-Sent Events allow a client to receive a stream of realtime events from Maximo. The process is client initiated and unidirectional, which makes it ideal for situations where you want to be notified and respond to realtime events from the server. SSE is widely supported, lightweight and is based on standard HTTP, so it can take advantage of HTTP features such as compression, proxy support and security mechanisms.
If you have any questions, comments or have suggestions for topics you would like to see us cover, please reach out to us at [email protected]
Appendix: Configuring Maximo Authentication for Postman
To interact with Maximo, we need to add an authentication header. For Maximo Application Suite (MAS) and later versions of Maximo 7.6.1 this means using an API key, or if you are still using Maximo 7.6.1 you can use the legacy Maxauth authentication header.
API Key
Maximo Application Suite (MAS)
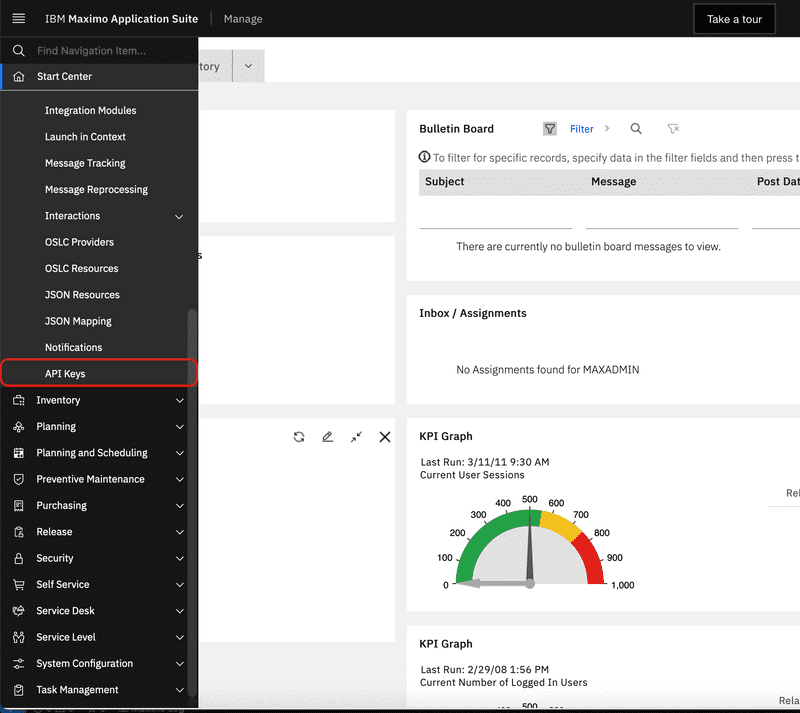
In MAS the API keys have a dedicated application. From the main navigation menu select the Integration menu item and then select the API Keys application.
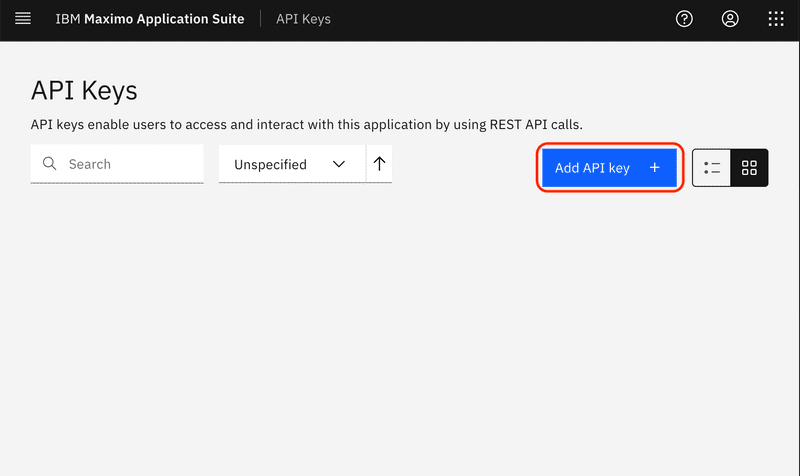
Click the Add API key button to create a new API key.
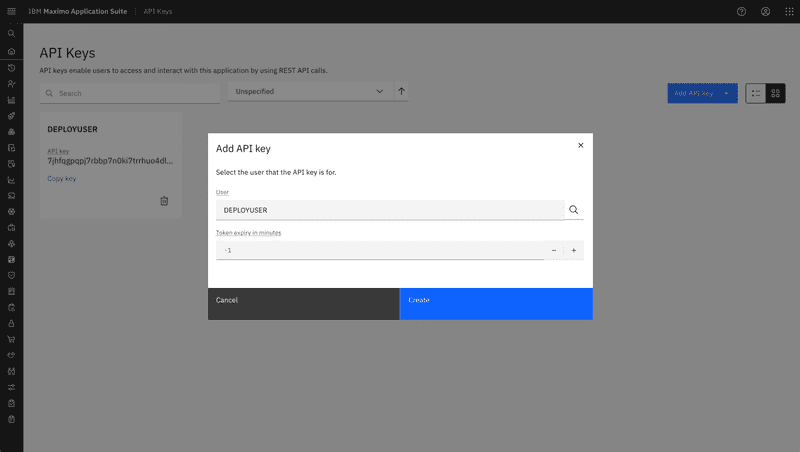
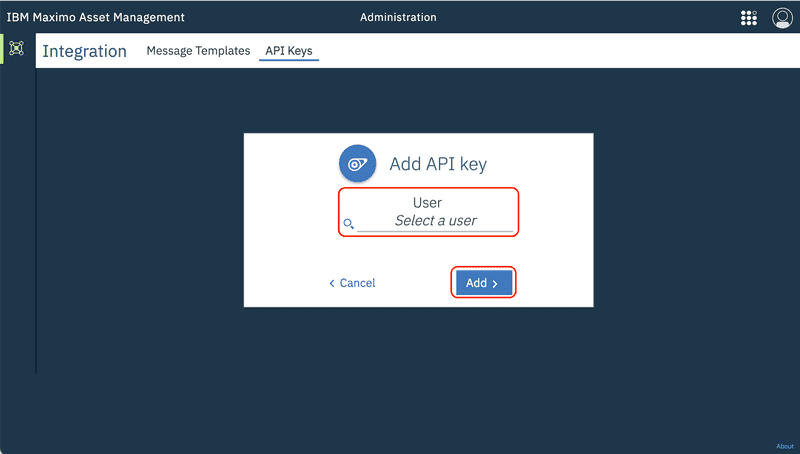
Enter the user that will be used to test the SSE, then click the Add button. We recommend a dedicated system user for this purpose rather than using a person's user account.
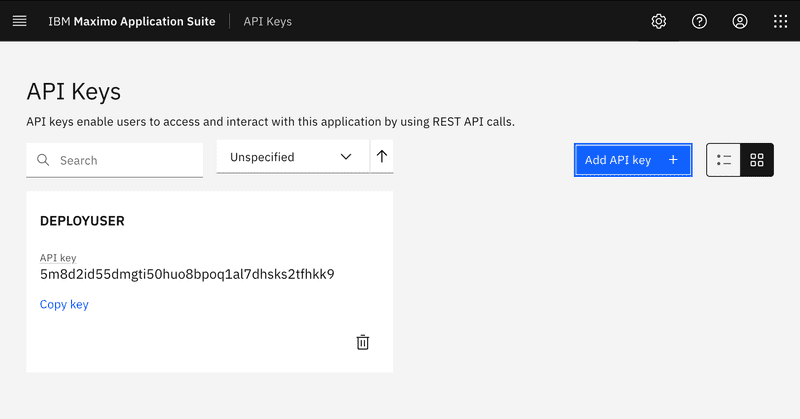
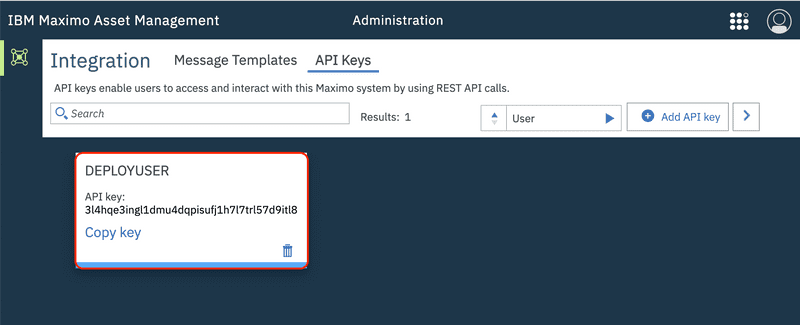
The user's API key will be displayed in a tile with the username.
Maximo 7.6
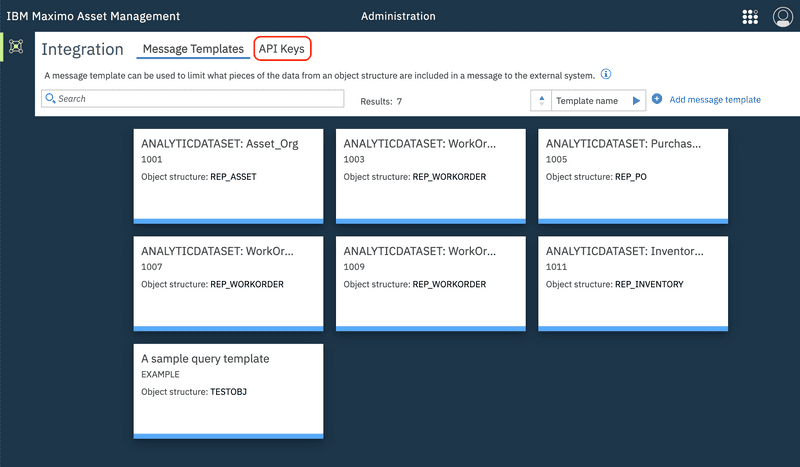
In Maximo 7.6 the API keys are managed in the Administration Work Center application. To access the application, select the Administration menu item and then select the Administration application.
Once the application launches, select the API Keys link near the top of the screen.
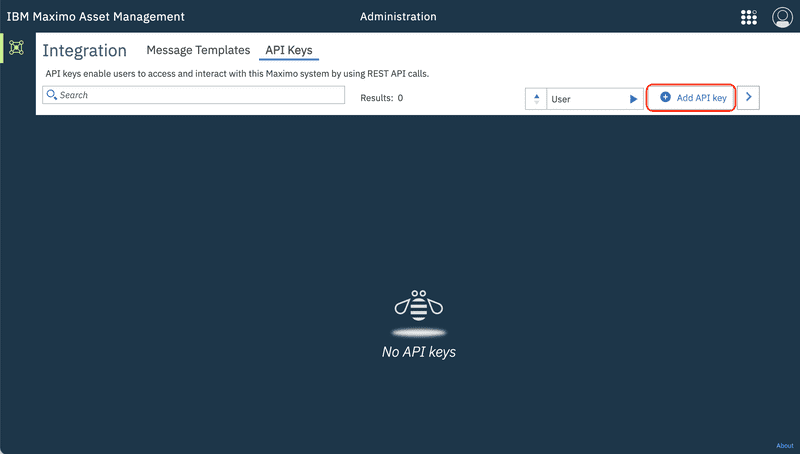
Click the Add API key button to add a new API key.
Enter the user that will be used to test the SSE, then click the Add button.
The user's API key will be displayed in a tile with the username.
Maxauth
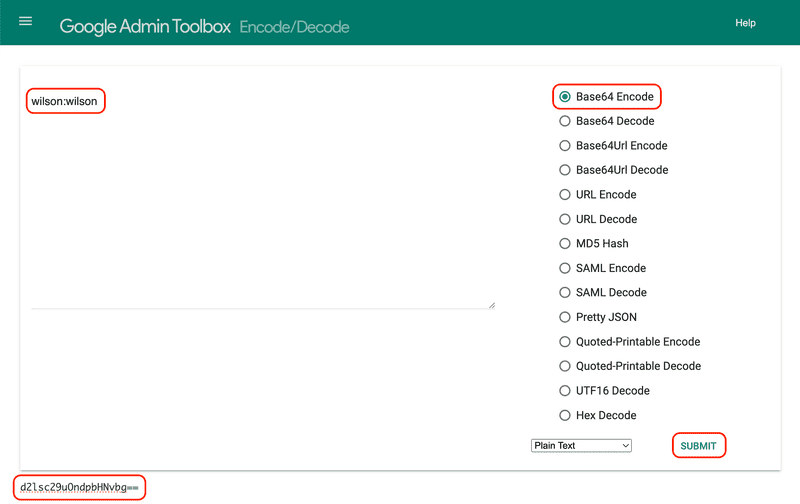
The maxauth header is a base64 encoded value that consists of the username a colon and the password, such as wilson:wilson. To base64 encode the value you can use the Google Admin Toolbox Encode / Decode service, which can be found here: (https://toolbox.googleapps.com/apps/encode_decode/)[https://toolbox.googleapps.com/apps/encode_decode/]
Enter your username, a colon and the user password, select the Base64 Encode option and then click the SUBMIT link in the bottom right of the screen. The base64 encoded value will be displayed in the bottom left. In the example below the input value is wilson:wilson and the output is d2lsc29uOndpbHNvbg==.


